|
|
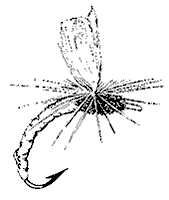
Klinkhamer Special
The following style of dressing took me four months to develop and has been received enthusiastically whenever I have demonstrated it. I have no special name for it but I never saw anyone using this technique. I also can imagine that there have been fly tiers who used the same method with normal thread even a long time before I was born. New is probably my idea to use Danville's spiderweb to secure the hackle. My method has been designed to make winding a parachute a simple operation, while forming an effective, durable fly at the same time. I never say that this improved technique is the best, (which is Tomas Olson's melted technique) but it is at any rate a very simple and quick method and I hope you will try it and form your own opinion. During classes and workshops I am able to teach my technique to all participants in less than one hour.
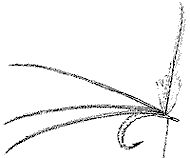
Before you start tying the fly, following important points to remember are: 1) The ability to see this pattern on the water is vital for many. Tie the wing long so that it can be spotted in fast, turbulent water. This is totally different from Tomas Olson's idea because he burned the wing to secure the parachute. It is probably the most durable way ever invented but his fly has no wing and therefore difficult to see by people with a poor eyesight. 2) Use Spiderweb thread to tie in and secure the parachute. This is very important for steps 6 and 7, as it does not damage the wound hackle fibres; it gives a strong and durable construction, and improves the appearance of the parachute. 3) A strong base for the hackle is essential and very important for the durability. It gives you a good practice to use the Spiderweb thread. 4) For better hooking power use wide gap hooks if the original is not available 5) Use top quality hackles, and give at least five full turns as the whole fly supported solely by the fibres of the parachute hackle. Sparse tied parachute hackles will do well on calm water but they easily sink in the strong rapids of a wild river. 6) A fly tied with a darker coloured thorax catch more fish then a fly without a darker thorax. 7) Body colours are according to your own preference. I find bodies of Fly-rite light tan, dark tan, or rusty olive are most effective. Tie the body very thin (slim) and well tapered. Start as close to the barb as possible. The thinner the body the more successful the pattern. 8) Do not prepare the body with floatant but only the wing. THE TYING TECHNIQUE: Step 1.
For the CS54 it is necessary to reshape the hook between thumb and forefinger. Place the hook in the vice and wrap the entire shank with the tying thread. This avoids the difficulty of a slipping wing when the fly is finished. Cut off a strand of poly-yarn and taper the tip with your scissors before tying in; this is to be sure the under body will be as slim as possible. Secure the yarn onto the top of the hook shank with the thread at the position shown in the drawing.
Step 2.
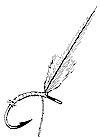
Wrapping your thread down to the bend and backwards. Try to make a nice tapered under body. I like a slim and well tapered under body. Be very critical in this stage! The better the under body the more beautiful the completed fly. Tie in the hackle so it lies in the same orientation as the yarn. Form an upright wing by tying up the yarn and hackle. (See drawings) This to be sure you have no problems with the hackle in the other tying steps.
Step 3.
Apply a small amount of dubbing to the thread. Take as much dubbing just to cover the under body. Tie the body very slim and well tapered. Start as close to the barb as possible. How thinner the body the more successful the pattern. Wind it along the shank and stop just behind the wing and cut off surplus poly or use the last piece of dubbing as underground for the thorax. In that situation it is not really necessary to cut off surplus. I recommend trying both techniques because for some people it is much easier to produce a better-looking thorax when you have made an under body.
Step 4.
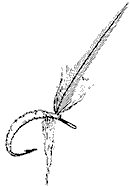
Tie in three Peacock herl fibres. You can also tie the strands in at their tips, this will help you to create a much nicer thorax but produce a less durable thorax. I secure the strands well also behind the wing. This provides that the thorax will come off.
Step 5.
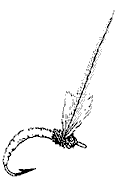
Wind herls in, two or three turns behind the wing and form a thorax by winding the rest of the herl in front of the bunch. Make a few extra windings, TIE OFF and varnish the head of the fly.
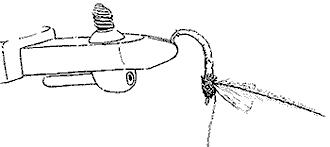
ATTENTION NOW! TAKE YOUR BOBBIN WITH SPIDERWEB.
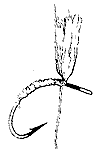
Step 6.
Now turn the hook in the vice, so that the wing is horizontal, with the bend uppermost. Grasping the tuft of poly-yarn, put on the spiderweb, wind several turns around the base of the poly-yarn and create a rigid wing base on which to wind the hackle.
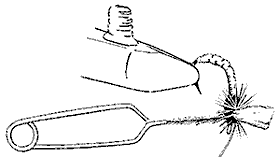
Step 7.
Wind the hackle around the base. Start at the top of your wing base, taking each successive turn closer to the hook shank. Take as many turns as the type of hook requires. Small flies about 5 windings and bigger flies at least 7 or 8 windings. Remember that the fly has to float mainly on the parachute. A lot of people wind their hackle in the opposite way, working up the wing, the hackle is less durable and may still come off. When you work from top downwards it ensures a compact well-compressed hackle and a most durable construction. Pull the hackle tip to the opposite direction as the wing and secure with a few turns of spiderweb. Secure well around the base of the wing between the wound hackle and body. Using your whip finisher. Trim away the waste hackle tip and hackle fibres that are pointed down. Take your varnish applicator and apply some lacquer on the windings just under the parachute. Be sure you varnish is very thin. I use cellulose diluted with acetate. I inject the varnish into the windings, thorax and wing post. The only thing you must remember is that you can not use permaflote or similar together with cellulose. It will be dissolved.
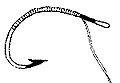
Step 8. The completed fly.
|
![]()
Back to patterns and
tying descriptions main page
Back to fly tying main page
|
||||||||