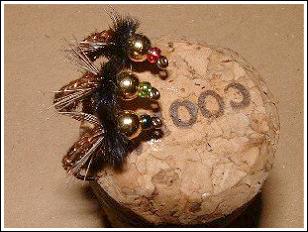
Hot Spot
Caddis
by Jason Akl
When thinking about this
year’s upcoming caddis hatches, an overwhelming amount flies come to mind. How is one
suppose to choose what flies to use; or even more challenging, how is one to suppose to
figure out patterns on their own that are able to get those elusive lunkers to come out of
hiding. If you are trying to create trophy taker patterns; a good idea is to incorporate
time trusted materials into their construction. And what could be better than peacock
herls. These iridescent herls have fooled fish from every continent and ocean around the
world and for fly tiers the uses are endless. Peacock herls are generally used by fly
tiers to create thick bushy bodies for flies that fish just can’t seem to resist. Not
only are these herls good for bodies but they can also be used as a topping fibers on
minnow patterns or as wingcase material for nymphs.
Another example of these uncanny fish
catching materials would have to be assorted bead heads. Metal and glass beads come in a
variety of shades, shapes and colors. Their usefulness to fly tiers comes mainly in
constructing the bodies of flies or acting as the head section. On the other hand these
beads do not just serve a cosmetic purpose, they provide much needed weight for flies to
get them drifting down on the river bottom.
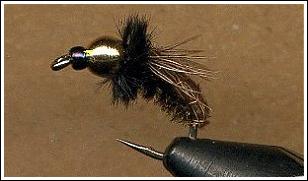
The hot spot caddis pattern is a fly that
was designed to imitate a caddis fly that is in its larval stage, and as you probably
guessed it contains the above special materials. One of the most important features of
this fly is the ease of tying. After just one initial run through of the pattern you
should be able to whip these flies out in just a few minutes, which means you will have
more time out on your favorite river or stream.
Materials Used In the Hot Spot Caddis
Hook: Mustad Scud Size
12
Head: Killer Caddis Glass Bead (Assorted Colors, I tie it in several
different colors but green seems to be the most consistent out of the group)
Thorax: Gold Bead/ Black Ostrich Herl
Thread: Uni-thread Black 8/0
Body: Peacock Herl
Over-body: Pheasant Tail Fibers
Rib: Copper Wire
Wings: Pheasant Tail Fibers
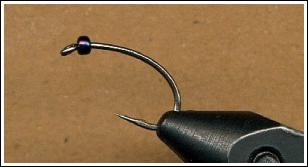
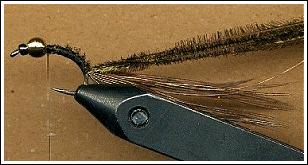
1. Start this fly by
crimping down the barb on the scud hook with a pair of pliers. Slide the glass bead over
the hook point and up the hook shank until you reach the back of the eye (For this
particular pattern the color of glass bead used was gunsmoke).
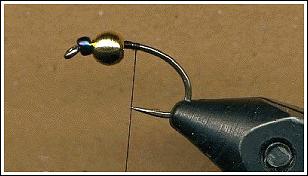
2. Next slide the gold
bead small hole first over the hook point and again up the shank until it butts up behind
the glass bead. Secure the scud hook into the vice securely and attach the thread.
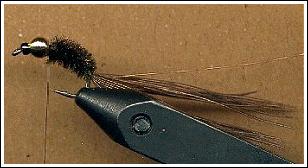
3. Clip a small section
of copper wire and tie down onto the top of the hook shank. Wrap the copper wire down with
thread until you reach the middle point of the hook bend. Advance the thread to the back
of the bead and tie in a small bundle of pheasant tail fibers that will be used to create
the over-body. Again wrap down the fibers until you reach the midpoint of the hook bend.
4. Select 4-5 nice
colored peacock herls and tie them onto the hook shank tip first. Wrap down to the
midpoint on the hook shank then advance your thread up to the back of the beads.
5. Spin the herls into a
thick rope and wrap them up the hook shank. Stop a quarter of an inch short of the back of
the gold bead to leave room for the thorax.
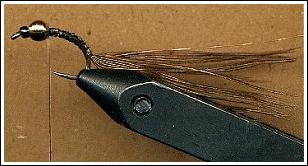
6. Select another 8-10
pheasant tail fibers and tie them to the top of the hook shank like wings. With a few
figure eight wrap separate the one wing into two smaller bunches, that are held to each
side of the flies body.
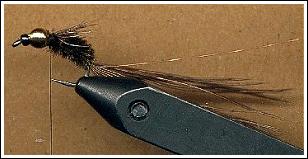
7. Pull the remaining
pheasant tail fibers over the body and tie down between the two small wings behind the
gold bead. Make sure that the fibers do not stray too much from the back of the fly. If
too much pressure is used when pulling the fibers forward they have a tendency to spin
around the body of the fly a bit. Wrap the copper wire up the hook shank in even spaces to
hold the pheasant fibers in place over the back of the fly. It should take 4 to 5 wraps of
the copper wire to reach the front of the fly.
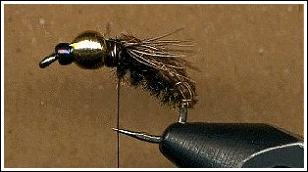
8. To finish the fly tie
down two black ostrich herls and wrap a thick black collar. Tie off the ostrich herls and
whip finish the thread. Tuck the small tag end of the thread under the bored out section
of the bead and apply a small drop of cement.
Tight lines and Smooth threads
Jason Akl
© 2004 |