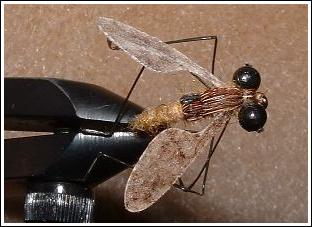
Culprit Crane fly
by Jason Akl
Crane Flies are one of the
most underestimated insects of the order Dipthera. People rave over fishing Caddis Flies,
Mayflies and Trico’s but hardly ever venture to think that Crane Flies could be a
very productive fish catching pattern. With numerous species of Crane Flies being found
throughout North America the one genus that stands out from the rest would have to be that
of the Giant Crane Fly (Tipula abdominalis). These large tasty morsels to fish represent
one of the few quality surface feeding opportunities for fly anglers ranging from early
spring to late fall.
Crane Flies most generally can be
seen prodding around the waters surface after a heavy rain, but due to the adults quick
dehydration time. Crane Flies are forced to stay near watery environments.
The best bet for anglers is to use
Crane Flies patterns after a light rain or whenever a stiff breeze presents itself. Crane
Flies are not the swiftest of flies and the slightest wind can send them tumbling to the
waters surface. Even though we perceive adult crane fly patterns as just an ordinary dry
fly it is not. Crane Fly patterns dead drifted will catch fish, but not nearly like when
the patterns is skipped and hopped along the waters surface.
Active presentations work best,
simply touch the fly down two or three times in the same spot as if a natural insect had
fallen to the water and was trying to take flight again. After you bounce the fly a few
times let it drift past the hole where you think the fish might be laying and pick it and
do it again. Usually, I take two or three attempts at a possible fish and if no reaction
is seen then it is time to move on.
Not only will this technique
work for you on big rivers and lakes but it seems to be especially effective for duping
trout out of small streams in tight cover. Trout seem to have a weakness for these
helpless over-sized looking mosquitos, so adding a few into your fly box can only help to
better your odds in hooking up consistently with quality trout.
Materials used in the Culprit Crane Fly Pattern
Hook: TMC Scud Size 10.
Thread: Tan Uni-Thread Size 8/0.
Body: Hares Ear Dubbing.
Eyes: Plastic Black Bead Chain Eyes.
Legs: Paint Brush Bristles.
Wings: Montana Fly Company Winging Material.
Thorax: Pheasant Tail Fibers.
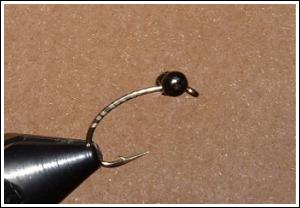
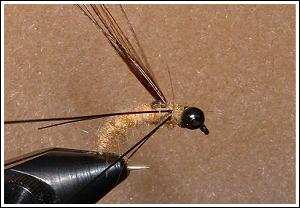
1. Start this fly by
placing your hook into the vise securely and attaching the thread behind the hook eye. Tie
in a pair of the black bead chain eyes behind the hook eye using figure eight thread wraps
and a little head cement. Once the eyes are secured in place bring the thread down to the
rear of the hook shank. The thread should stop at approximately the point where the hook
begins to curve.
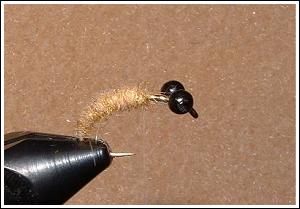
2. Pinch dub the thread
and begin to wrap a nice, slowly tapering body forward up the hook shank. Stop at
approximately the 1/3 mark on the hook shank and clean off any dubbing left over on the
thread.
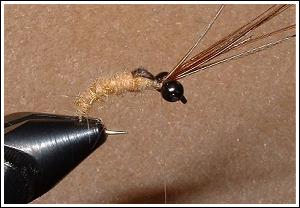
3. Clip 10-15 long
pheasant tail fibers and tie them down in front of the dubbed body you just wrapped.
Continue to dub the body once again, but this time one for 4-5 wraps of dubbed thread.
Once the newly dubbed section reach the same taper as the rest of the body pull the
pheasant tail fibers forward over the dubbed body and tie them down to the hook shank.
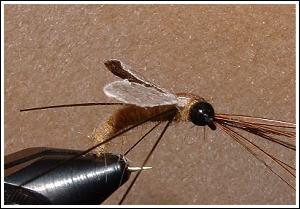
4. In front of the
wing-case you just created tie in two paint brush bristles per side. Pinch dub the thread
once more and fill in the body between the legs and up to the back of the bead chain eyes.
5. Using you MFC wing
cutters or scissors cut out a pair of wings to be tied on top of the back of the fly. Tie
in the wings, one per side behind the bead chain eyes. The wings should extend just a
little past the end of the hook. Dub the thread once more and cover the tie down point of
the wings. Pull the remaining pheasant tail fibers forward over the bead chain eyes and
tie off at the rear of the hook eye.
6. Clip the tag ends of
the pheasant tail fibers and whip finish and cement the thread. Using heated tweezers
pinch and bend the paint brush bristles to form joints in the legs (two bends in opposite
directions for each leg). Lastly apply a little head cement to the leg joints you just
created to hold them in shape even after routine abuse.
Tight lines and Smooth threads
Jason Akl © 2004 |