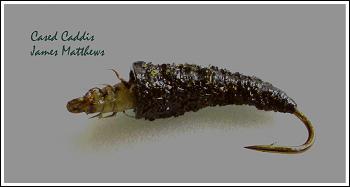
Cased Caddis
(originally devised by Steve
Thornton)
by James Matthews
Much has been written over the
years of the Cased caddis, from Hans van Klinken’s Leadhead to Oliver Edwards’
Peeping Caddis, both unique grayling deceivers in their own right, and many more
(fishcatching) variations may be featured here later.
In this article we’ll look at
another variation which you may not be familiar with: Steve Thornton’s Cased Caddis.
The most striking feature is the
way the case is constructed, using lead wire in steps and stages, flat floss and freestone
caddis coating. It also features a pen lid (stroke of genius!) It’s quite simply the
most realistic caddis I have come across to date. Remember, although Steve designs
realistic flies, first and foremost they are fishing flies. These flies do look fantastic
in a frame, but their rightful place is at the bottom of your favourite stream.
You can copy a whole host of
caddis patterns with this style, for example, large cinnamon sedge (potamophlax
latipennis), brown sedge (anabolia nervosa – I’m on the pills for that one!),
caperer (halesus radiatus – use mouthwash for this one) and many more. I don’t
want to bore you with Latin any more, but as the Greeks would say;
"O Kadis mou einai pano sto
dendro", which translates as "My caddis is up a tree". Oh
bugger.
For this fly you will need:
Thread: Powersilk,
Dyneema or any other fine GSP thread.
Hook: Mustad 80050 (check the caddis you’re trying to recreate to
decide on size of hook, but could be around size 10-12).
Legs: Golden Pheasant centre tail or plucked ostrich herl.
Grub head: Nymphskin or Flytyers Designer Skin.
Colouration: permanent markers or Dylon dyes.
Abdomen: lead wire, flat yarn, Freestone Caddis Coating (available from
Virtual Nymph outlets), black Bic biro pen lid (available from stationers or your office
supply cupboard!)
Instruction:
Clamp the hook in the vice and nip
down the barb.
Tie on your thread behind the eye
and wind on for 5 or 6 mm – measure this, it’s crucial.
Tie on your nymph skin by the tip,
ie the corner (no angled cuts for this one). Obviously make sure it’s tied in
securely.
Cut a thin sliver of lead sheet or
your preferred underbody (I’m currently playing about with tungsten lace). If using
lead sheet it should be 1.5mm or slimmer.
Then wind on to build up an
egg-shape (think buzzers!) with a neat taper. Wind your thread forward, covering the
underbody.
Take your nymph skin, stretch it
and wind forward to the hook eye, then tie off just before the eye. Four or five turns
should secure.
Whip finish and snip off the tag.
Dye your thread with a permanent
brown marker. Build a small head and whip finish again.
Wind backwards and add Veli Autie
style legs for the first three segments on either side. Tie off and snip off your thread.
Take a Bic biro pen lid and from
the tapering end cut off 5mm with a scalpel blade.
Take the fly out of the vice and
push the pen top, wide end first, over the hook, to cover the tail end of the peeping
grub. Secure with epoxy with a dubbing needle.
Tie on your thread behind the
penlid. Build up a tapering effect with the lead wire, ie thinner at the back end,
becoming thicker in three steps.
Take your flat yarn and tie in
just behind the plastic pen lid. Tie in all the way down to the thinnest segment of lead
wire, then wind the yarn over the lead segments, following the tapers quite securely
– no lumps or bumps!
Coat the yarn and pen lid with
Sally Hansen’s Hard as Nails (Boots the Chemist), then sprinkle on some freestone
caddis coating. Rotate the vice and cover all but the peeping grub evenly.
Give it a try – you’ll
love it (grayling love it even more – a real crunchy mouthful!)
Just be careful near the trees.
James Matthews, Ayr
November 2004 © |