Ammonite nymph
by James Matthews
This is a pattern I first came
across in 1998. It was devised by the Lincolnshire-based flytyer Steve Thornton. The Ammonite
takes its name from ammonite fossils; the shell-like structure of the fossil is echoed in
the spirals of the nymph’s body segmentation. It is a generic searching pattern used
to represent everything and nothing. Fish will take the ammonite for hydropsyches, rhyacs,
stoneflies, mayflies, shrimps, alders and just about anything else you’re likely to
encounter under the water, just vary the colour and size. What I will say about this
pattern is that grayling and trout find it irresistible. It’s a really robust fly,
one that you can drag about the stream bed and it’s virtually indestructible. Another
great thing about the fly’s design is its great water entry, slim profile, mobile
legs and silhouette, something that the Czechs and Poles have known for a long time. This
is a fly to rival their best efforts.
For this pattern you will need:
Hook: Kamasan B100 size
8 – 16 (for me, 10’s most popular size).
Thread: any GSP – Powersilk, Dyneema etc.
Abdomen: Flexibody or Flexiskin (clear).
Underbody: Thin lead sheet and tungsten bead (optional).
Thorax: Flexibody or Flexiskin (clear).
Legs: Partridge hackle.
Dubbing: Rabbit or SLF River & Stream.
Glue: Hard as Nails.
Underbody: Flat floss coloured to match dubbing.
Colouration: Edding permanent marker - brown
Tying instructions:
Wind your preferred thread from
the eye down the shank till you reach a point just short of the middle of the gape. Cut a
1.5 – 2mm wide strip of flexiskin about 14cm long, cutting a small angled tying in
tag at one end. Make sure it’s tied in securely. With your lead sheet, I use a
scalpel and a steel ruler, cut a thin sliver the same diameter as the hook shank.
Take your thread that’s
hanging and wind on towards the hook eye, then pick up your lead and position on top of
the hook. You need to leave 2-3mm exposed towards the hook eye ( ie no lead) and 1-2mm
before the flexiskin.
Wind your thread over the lead,
remembering to stay on top of the hook at all times. Nip off the lead when you reach the
tail end of the fly (Powersilk is good for this, just add some tension). Go back to 1mm
after where you began tying in the first lead strip, and wind on another layer, stopping
1mm short of the end of your first layer of lead. Repeat as necessary, each time beginning
and ending 1mm short of the previous layer until you have built up a profile like an
armadillo.
With your thread hanging towards
the eye end, tie on your flat floss on top of the hook shank and wind down to meet the
flexiskin. Take your thread and wind on towards the eye and half hitch.
Wrap your yarn in touching turns
to the top of your lead overbody then back halfway down towards the barb of the hook. Then
wind on to the hook eye, whip finish and tie off just before the eye.
Take your flexiskin and stretch it
slightly then start to wrap round the yarn, exposing 50% of the previous wraps. Wind
towards the hook eye and tie off, then snip off the waste.
Cut a new 4mm wide strip of
flexiskin (this is your thorax section) and tie on on top from the eye, winding back to
just opposite the hook point. Make sure it’s tied in securely.
Leave your thread hanging just
opposite the hook point, then take a partridge feather and with fine tweezers catch the
very tip. With wetted thumb and forefinger lightly stroke the fibres, concave side
uppermost, and tie in by the very tip. With your thread conveniently hanging opposite the
hook point, take your preferred dubbing material and split your thread. Dub into one of
the fine strands, spin your bobbin and watch this make a fine rope of secure dubbing
(remember less is more).
Take your Hard as Nails and dab on
a small amount on top of the dubbed thorax. Pull over the partridge feather and tie off
behind the hook eye.
Add on another dab of Hard as
Nails on top of the partridge. Try to make sure the legs come down either side. Pull over
your thorax of flexiskin, add a couple of wraps, snip off the waste tag and whip finish.
Then with your Edding marker stroke from eye to the back of the fly. Add a drop of varnish
at the head wraps.
Job done.
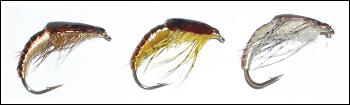
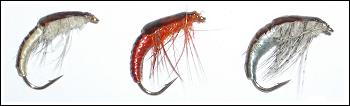
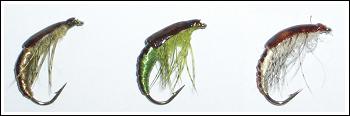
This is a fly I really
wouldn’t want to be without when I’m nymphing for grayling or trout. The
ammonite lends itself to being tied in a variety of colours, as you can see from the
picture; hot orange, cream, golden tan and olive being particularly attractive to
grayling. I also tied another fly, on a Charles Jardine grayling hook, which was
predominantly red except for the thorax section, which was Turrals gold dubbing. One of
the aspects of flytying I enjoy most is taking a pattern and tinkering with it, trying new
variations and testing them on the fish.
The ammonite nymph is a fly
I’ve sent to friends all over the world, from Australia (apparently it’s big
Down Under), Oregon and Sweden to the chalkstreams of Southern England (hi Roger) and
throughout all the river systems of Scotland. The verdicts have ranged from
‘I’ll take a dozen in each colour’ to ‘I’ll take a dozen in each
colour, in all sizes’.
If you don’t have a few of
these in your box, I’d strongly urge you to tie some.
James Matthews, Ayr
November 2004 © |