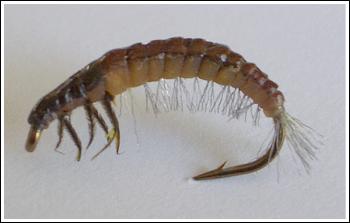
Hydropsyche larva
using organza gilling technique
by James Matthews
This time round we’re going
to attempt to tie the ever-popular hydropsyche larva, again using my organza gilling
technique. As far as I’m led to believe, there are between 12000 – 15000 species
of this wee beastie worldwide, give or take a few hundred, with around 200 species in the
UK alone. This is probably the most prevalent free-living caddis in our home waters in the
UK, and whenever I kick sample or turn over a few stones this is the one I’m most
likely to encounter.
The colouration varies from river
to river; the hydropsyches in a chalkstream tend to be a bright, vivid green, not unlike a
rhyac, while further north you’ll find a darker, more olive colour.
Continental hydropsyches can be a
milky, creamy beige, through to brown and olive, so again it’s important to check and
match the hatch in your local water. What differentiates these from the rhyac is the two
anal appendages, and the less heavy segmentation of the body. Also, the gills are on the
underside, in two fine rows.
Anyway, for this pattern
you’ll need:
Hook: Partridge K4A,
various sizes, or Tiemco 947BL.
Underbody: thin lead sheet.
Thread: any GSP, eg Powersilk, Dyneema.
Body: nymphskin.
Gills and tail appendages: organza.
Legs: golden pheasant centre tail (Veli Autie style).
Colouration: Edding Kurecolour pens or Dylon dyes.
Tying instructions:
Clamp the hook in the vice, tie on
your thread and go well round the bend.
Get a few organza strands, and tie
in securely, well round the bend. Then with your thread come underneath the trailing
strands (this lifts them up). Bring your thread over the top and add a whip finish. Trim
the tail ends to a stump.
Take your nymphskin and cut at a
45 degree angle. Again, tie in securely and leave the thread hanging. Then cut a 1.5
– 2.0 mm wide strip of the lead sheet and wind on your preferred caddis shape
(remember to leave plenty of room for the thorax and eye end).
Tie on another GSP thread and go
over the lead windings, then take the thread wraps back to just before the eye, just a
couple of millimetres. Now you’re ready to do the body.
Stretch the nymphskin and pull
tightly, then start winding forward, overlapping by 50%, then relax tension slightly,
again by 50 % .Overlap until you reach the thorax area and increase tension again. Then
tie off with the thread that’s hanging conveniently. Whip finish and snip off the
waste.
Take your first thread, spin it to
make a fine rope and follow around the first two segments of the hydropsyche’s body,
following into the grooves of the nymphskin segments. Invert the vice, and now you’re
ready to gill.
Take two or three strands of
organza (more can be applied if you want a bushy hydro). Where your thread is hanging,
bring the organza under the thread and park it on the underside of the nymph. Tighten (you
will notice that the organza is pulled into the nymphskin grooves). Repeat the process
until you reach the thorax area, then tie in Veli Autie legs on the three remaining
nymphskin segments. Whip finish and tie off. Snip off your thread then grab the trailing
organza strands on the underside of the nymph and with curved scissors trim the organza to
2-3mm.
Then with an olive Kurecolour pen
stroke over the back of the nymph from eye to tail. Then get a black permanent marker and
colour the thorax section.
You have just completed a fairly
realistic bug and a fantastic fishing fly
James Matthews, Ayr
November 2004 © |