|
Step
by step tying sequence
on half-inch tube of "Long range" type
By Jurij
Shumakov
Page
1.
I have been asked
many times to write about tying on short half-inch tubes. What I found
is that it is almost impossible to describe the tying sequence
correctly. I therefore decided to take a few pictures, so any tier can
repeat the sequence. It is always better to see once, rather to read
ten times or to hear a hundred times. J
(Shonguj Fly has been
taken as an example, because it is one of the most complicated flies I
tie. For simpler patterns you just pick up the steps you need.)
Before you start to
tie the fly you must prepare tube components for the tying.
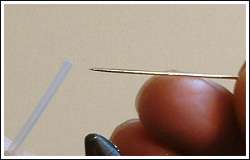
1. There is
the option of what kind of tube holder to use. Some tiers use firmly
made tube tools, some use a blind hook. I prefer just a simple sewing
needle. A set of needles with different diameters and with a long eye
covers all my needs. The cross section of the needle's eye is square.
When you set the inner plastic tubing on needle up to eye it will be
fixed on square part of needle, preventing rotation of the tube under
tying procedure. You should remember that even hard plastic tubes
change in diameter during tying, so if you choose a needle, which goes
quite tight into the plastic tubing, you may face a situation when it
will be difficult to remove needle from inner plastic tubing after
tying is completed.
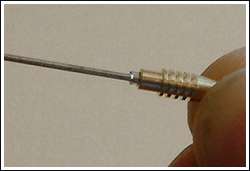
2. You need to
make a rim, which will hold the metal body tube from behind. Set a
piece of plastic inner tubing of about 2-2.5 cm in length on suitable
needle, but not up to its eye. Metal of needle prevents plastic from
melting too quickly and burning. At the same time, the initial inner
diameter remains unchanged.

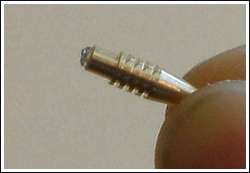
3. Set the
metal body over the plastic tubing, leaving about 1.5-2 mm of plastic
tubing sticking out of metal body. Metal body and needle prevent
melted plastic from moving forward too quickly and helps to form
perfect rim.
4. Regulate
lighter's flame to minimal level. When you melt, keep plastic in the
lowest part of flame.
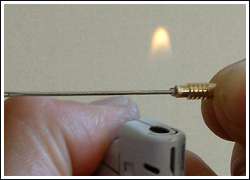
5. Hold set of
tubes firmly assembled in your fingers while building rim. Let the
melted plastic cool down without changing the position.
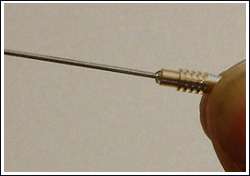
6. The tube is
now ready for tying. For those who would like to add some extra
attractiveness to a future fly, I recommend to paint the grooves of
the metal body with with colour varnish. For this purpose you can use
any quick drying varnish. For the past three years, I have mostly used
the following colours: orange glow and yellow glow varnish of the
American Plasti-Kote from "Mister mini-color" series;
Veniard's black and red tying varnish; special fishing varnish in
fluor orange, Green Highlander fluor and pink fluor from Russian firm
"Kabota". This varnish is silicone based. I usually adjust
the colour of grooves to wing colour or to common image of my fly.
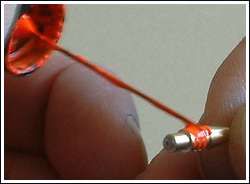
7. If you
decide to paint grooves, leave the assembled set of tubes on the
needle after forming the rim. Prepare any kind of napkin, or a piece
of double layered toilette paper. Quality is the key. J
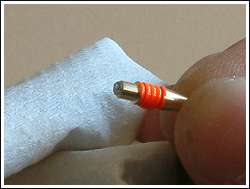
In fact, I am
quite serious. You should avoid the use of too soft or too hard paper,
because in the first case, soft paper will quickly absorb varnish,
even from grooves, and in the second case, it will not absorb excess
varnish.
8. Use another
needle to take a drop of varnish and apply it on the grooves. The varnish
will quickly penetrate inside of grooves by capillary effect.
9. Quickly,
but accurately, remove excess of varnish with paper. Original Long
Range tubes have nicely machined and very smooth surface, so it is not
difficult to remove varnish traces from metal body.

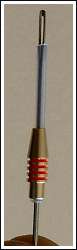
10. Leave the
painted tube in vertical position until it dries.
Article
continues on page 2
Text and
photo by Jurij Shumakov 2005
|