|
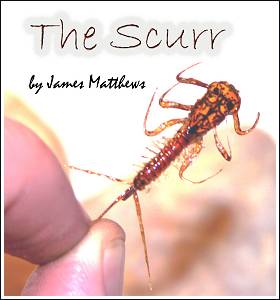
The
Scurr
(Heptagenid / Stoneclinger)
There is a
saying "There's nothing new in flytying", which seems a
contradiction as modern flytyers seem to be churning out new and super
improved patterns all the time. You just have to look at the range of
magazines dedicated to our pastime with the emphasis, more often than
not, on the new fly. I'm a sucker for buying these magazines and
reading about the authors' insights into tying or flyfishing. I'll try
a new approach or wonder fly, give it a swim, then more often than not
it will sit in the corner of my fly box just on the off-chance I might
need it. In the majority of cases a new approach can be traced to what
has gone before and at times we are reinventing the wheel, but
sometimes a technique or material inspires me and I find a better way
of doing something. I'm not scorning the modern approach because it is
what might attract a whole new generation of fly dresser and fishermen
and everything needs to evolve, but much of what we do has survived
hundreds of years of refinements precisely because it works.
I'm a great
believer in listening to some old-timers and gaining insight and local
knowledge from their slant on fly-fishing. One such person is Bill
Bryden from Auchinleck, who was a friend and neighbour for many years.
Bill's knowledge of the local rivers is second to none, having fished
the River Ayr, the Nith and surroundings during the middle of the last
century.
Bill's brother in law Sonny was an expert on nymphing. Sonny would
wade in, waist deep in all weathers and at the time was known locally
for extracting fish, big fish, from places previously overlooked by
other anglers. Remember, in the heart of the mining community this
wasn't catch and release sport fishing but for the pot, feeding
families and neighbours.
Bill explained
in great detail Sonny's approach. This was a variation on the Czech
nymph theme; the man was ahead of his time, over sixty years ago. Bill
and Sonny would develop patterns mainly on the spider theme. Not the
delicate North Country spider but a more robust version, ideally
suited to the serious business of catching fish for food.
"Speeders", he said, "That's all you need except for
the scurr" It was like a foreign language to me, but Bill
elaborated for me: the scurr was what I knew as the heptagenid or
stoneclinger, and his other fly of preference, the gadger, one of my
own favourites, the stonefly. Inspired by his trip down memory lane,
Bill appeared with an old handmade vice and proceeded to tie a fly. I
was transfixed as, shakily at first, he produced peacock herl and
hackle and turned them into a beautiful wee fly. Bill then got out an
old rusty Rowntrees chocolate tin and showed me a couple of flies
which had been there for over forty years, crude by today's standards
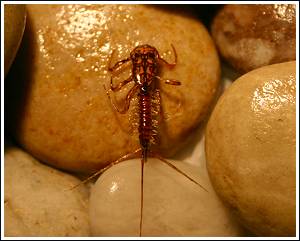
but instantly recognisable, capturing the profile of the heptagenid.
Here was the famous Scurr.
**************************************
Although the
family Heptagenidae has gained popularity in fly boxes all over the
world, there are still serious river anglers who are devoid of these
nymphs in their nymph boxes. This is the equivalent of a still water
angler who doesn't own buzzers. Unthinkable! The pattern that really
brought the heptagenid to everyone's attention is the one in Oliver
Edwards' Fly-tying Master Class. This is a cracking pattern although
as time doesn't stand still in the fly-tying world, with new materials
created and new techniques employed, the pattern leaves room for
updating and improvement. Even Oliver himself has tweaked and refined
his original dressing over the years.
As far as the
constant stream of "new improved" techniques showcased in
magazines goes, you have only to think of disposable nappy adverts,
where each improvement dismisses its predecessor as being inadequate.
Just how good can a nappy get? Is there a point when a nappy, or a
fly, becomes so perfectly suited to its purpose that it cannot be
improved? From Sonny's heptagenid tied with bronze mallard, to Oliver
Edwards' with its raffene wing capsule, to mine, using a photographic
image for head and wings, all will take fish. And from 1970s Pampers
to 2005s Pampers, all will keep a bottom dry. Talking of bottoms, fish
the Scurr close to the river bed; an upstream presentation will
suffice.
**************************************
The
Scurr (Heptagenid) Tying Instructions
Hook: Gaelic
Supreme nymph hooks up eye; size 16, 18( check out the website)
Underbody: Tungsten
stretch lace
Body segmentation:
Narrow gauge Flexile; available in various colours - transparent for
this dressing
Legs: Narrow
gauge Flexile; see note below re leg preparation.
Head and wing buds:
Finesse Heptagenid /stoneclinger DV wingbuds or Virtual Nymph
stoneclinger wingbuds
Epoxy or Mattlack spray varnish (available from art shops or email
if you are struggling to source it)
Thread:
Powersilk and spiderweb
Gills: Organza
or micobarbarbed ostrich herl (available from Finesse)
Tails: Synthetic
quills, peccary, porcupine or nylon paintbrush bristles
Colouration: Permanent
markers in brown, olive, yellow etc. Mark the wingbud's rear arch
black for a near to hatching nymph
Prepare the
wingbuds by spraying with Mattlack spray varnish, colouring as
required and cutting out. When the fly is tied apply either epoxy or
another coat of Mattlack to seal the colour. Legs can also be prepared
ahead of time - see notes below.
Tie on your
thread behind the eye and flatten it. Bind down to a position opposite
the barb, cut round the wing bud and leave a tag at the front (this is
your tying in point). Tie in, making sure the head is central to the
hook shank and add a drop of head cement to your tying foundations.
Wind down to a
position just going onto the bend, tie on your preferred tails (three,
for the heptagenid) on top of the shank and pull the tails back for
length. They should be slightly longer than the nymph itself. Spin
your thread and prepare to splay the tails. You should have right,
left and central tails. Figure of eight between the two outer tails
twice then come from underneath and under the middle one. Voila: three
tails nicely splayed.
Take your
prepared flattened Flexile 6 to 7 inches in length (I use my
girlfriend's ceramic hair straighteners - the Flexile doesn't damage
the straighteners, so you won't get complaints. Experiment with the
Flexile and the straighteners for a while to get the best results) and
make a small angular cut. Tie this in with a few wraps of thread, just
where you tied in the tails. Wind on to a position 2 or 3 mm from the
eye.
Select your
tungsten stretch lace and flatten with flat nose pliers. Tie on either
side of the hook and bind down, increasing tension toward the rear end
(just opposite the barb) of the fly. Cut off the waste and do the same
again with your tungsten lace, this time stopping short of the rear
arch of the wing buds. This helps with the proportion and shape of the
fly.
Cover the
profile of the nymph evenly with your tying thread. Flatten the
profile all the way down to your Flexile with flat nose pliers. Leave
your thread parked at the end of your Flexile and tails. Stretch the
Flexile towards you and apply colour with your permanent marker. With
butting turns overlap the hook with the flexile releasing tension as
you go.
Catch on your
spider web thread behind the wing capsule and tie off the Flexile
strip 2 or 3 mm from the eye. Snip of the waste tag and whip finish.
You're now
ready to gill with organza. Spin your powersilk and colour with the
same permanent marker you used for the Flexile. Advance one segment of
the body. The thread should be on the opposite side of you. Pick up
your organza strands 3 or 4 and come under the thread position on the
side facing you. The thread should still be parked opposite you. Do
the same on the other side and continue gilling just past the tail end
of the heartshaped wing bud. See my rhyacophila for a more indepth
description of organza gilling.
You're now
ready to make realistic stone clinger legs. You'll need a candle and
steady hand! Take a six inch piece of narrow gauge Flexile and
carefully pass it through the candle flame holding both ends of the
Flexile. Before your eyes the inner core melts and reduces by half.
Again, experiment a bit to get the best results. Take your scissors
and cut through the middle of the fine section.
Heat up your
ceramic hair straighteners and prepare to make the femurs. With the
very edge of the straighteners press the thicker part of the flexile
and then release. One more manoeuvre, this time using a cauterising
tool. Slightly melt the junction between the thick and fine parts of
the leg to kink it (this is the "knee") I prepare dozens of
these legs in advance while watching TV. Aim to get the fine point
about 5mm in length and the thicker part of the leg 6 to 7mm, tapering
down with each leg then simply colour with a permanent marker.
At one body
segment above the heartshaped wingbud, tie in the back legs, using the
fine point of the femur (thicker section). This is a similar technique
to organza gilling; flip the leg over with your thread parked the
opposite side, then do the same on the other side and whip finish.
Advance one or two segments towards the head and tie in your middle
set of legs. Whip finish. Advance another couple of segments,
depending on size of wingbuds and tie in the front legs. Whip finish.
Push the
wingbuds down and apply a whip finish just behind the eyes of your
Scurr.
Seal the wingbud colour with epoxy or Mattlack spray varnish.
**************************************
I now use the candle
/ Flexile technique for caddis, stoneflies, heptagenids, baetis,
greendrakes, beetles, alders, in fact just about anything you're
likely to encounter under the water (bug wise!) Flexile has the
advantage of being robust ,giving the illusion of movement with added
translucency and authentic silhouette.
The wingbuds and
Flexile are available to buy - just contact me at
Text and Photos by
James Matthews 2005 ©
|