|
“Reinforced” parachute
hackles
By Milan Trickovic
Tricky
part in tying parachute flies is how to wrap and secure hackles such as
to get durable and preferably elegant fly. In literature, DVDs and over
the Internet one may find various methods, which require more or less
skill and effort from the tier.
Probably the most popular method is to
wrap tying thread around the wing base to create a stiffer post, and
then to wrap the hackles around, squeezing each turn below the previous
and the fly body, and finally to secure hackles and tie the finishing
knot around the wing base below the hackles, instead around the hook
neck. To facilitate the process the hook can be fixed in vice in
vertical position, i.e., to have the wing in horizontal direction, so
wrapping and tying around it can be done in usual hand movements.
In my
experience, although this method is well explained and perfected by many
masters of the art, it requires patience and precision, not always easy
for us with the lesser skills. Thus, unless tied really carefully, some
odd hackle fibers would often stick in the wrong place and mess wrapping
process and tying of the finishing knot. Also, sometimes the hackles
would tend to “climb” the wing, making the fly a bit clumpy and tier
unpleased (see an example on Photo 1 below), even though the fish most
probably would not mind this.
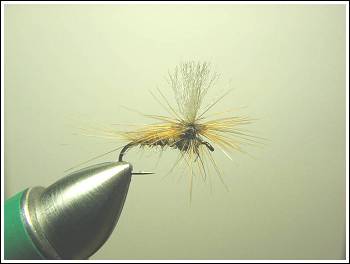
Photo 1
However, if you would like to
try another method for making parachute hackles, maybe you would be
interested in the following, which I have been using for years now,
especially for flies #14 and larger, since it gives very durable flies.
The basic idea is to use a ribbing wire to form a small rounded loop,
which is tied to the hook and bent vertically in front of the wing so as
to create additional support for wrapping the hackles. There is no need
to create usual prominent post at the base of the wing. Wrapping of the
hackles around the wing and loop is relatively easy, and can be done
simply from bottom to top, since the loop opening is keeping the turns
together. The hackles are then secured and tied around the hook neck, as
with the classic flies. After this the wire loop is bent down to press
the hackles to the hook, which results in a durable fly with soft wing
and low positioned "reinforced" hackles (Photo 2a below).
Alternatively,
a bunch of feather fibers, like for nymph thorax covers, can be used
instead of the wire loop. This also gives durable fly, with the hackles
pressed and divided by the feather fibers secured at the hook eye (Photo
2b below).
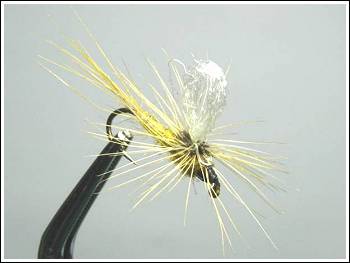
Photo 2a
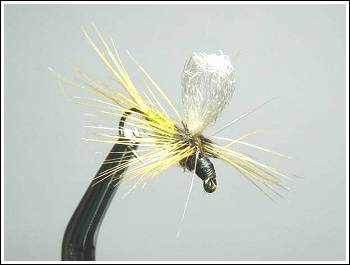
Photo 2b
The method with the wire loop is
illustrated below on example of an olive up-winged fly size #14, with
dubbed body and polypropylene yarn wing:

Photo 3a.
Take a ribbing wire (in this
example gold mid-weight) and create a loop by bending over dubbing
needle or similar. Place the tip of the loop aligned with the hook eye
and tie with the thread. Leave the other end to be used latter for
ribbing the body (Photo 3a above).

Photo 3b.
Tie the tails and the wing. Bend
the wire loop in front of the wing. In this example a small space is
left between the loop and the wing (Photo 3b above). This will
eventually force the hackles to slightly lift at the tail side, i.e. to
be inclined toward the hook eye (see Photo 3i below). If no space is
left between the loop and the wing, the finished hackles would stay more
horizontal.

Photo 3c.
Create the body (dubbed in this
example) and rib with the free end of the wire left at the tail side.
Tie the hackles feather (Photo 3c above). Instead horizontally as shown
here you may tie the feather inclined, as recommended for the method
mentioned at the beginning of this paper.
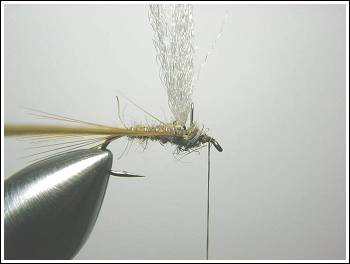
Photo 3d.
Create the thorax and leave the
tying thread to hang over the hook eye shoulder (Photo 3d above).
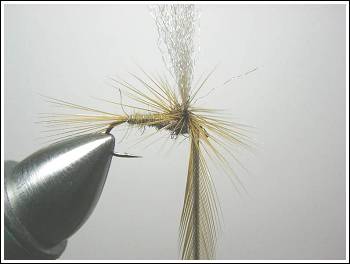
Photo 3e.
Wrap the hackles around the wing
and the wire loop, in horizontal turns from bottom upwards. Depending on
the quality of the feather and roughness of water you intend to fish use
from 2 to 4 turns. I prefer 2 to 3 turns for calmer water and 3 to 4
turns for more rough. Leave the hackle feather hanging by the hackle
pliers over the hook (Photo 3e above). If you prefer you may also wrap
from top to bottom, squeezing each turn between the previous and the fly
body, but this is more complicated and if you can do it easily then in
fact you do not need this wire loop method.

Photo 3f.
Collect the hackle fiber and
stroke back to free the eye. Secure the hackles with a few wraps of the
tying thread around the hook (Photo 3f above).
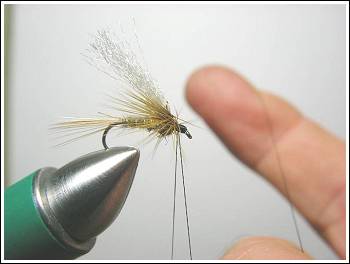
Photo 3g.
Create the head and tie the
finishing knot, as you would do when tying a classic fly (Photo 3g
above). In this stage the hackle fibers are still pointed back.

Photo 3h.
Press the wire loop down towards
the hook eye (Photo 3h above). Spread the hackles evenly around the
wing. You may leave a gap over the hook eye to facilitate connecting to
leader (see Photo 3j below).

Photo 3i.
Trim the wing and put a drop of
head cement to the knot and over the wire. Do not add too much at the
wing base if you want the wing to remain fully flexible (Photo 3i
above).
And that’s it. More views of the
finished fly and the wire loop within it are shown on Photos 3j, 3k and
3l below. Well, it is not a perfectly tied fly as the tails could be
more in horizontal plane, and the ribbing could be more even, and so on.
Newer mind, I hope it has demonstrated in sufficient detail how to make
"reinforced" parachute hackles, and actually this very fly did deceived
some nice wild brow trout.
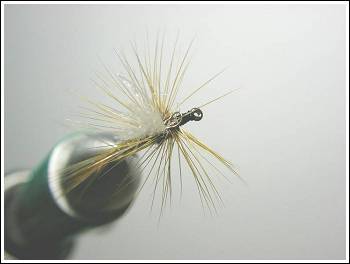
Photo 3j.
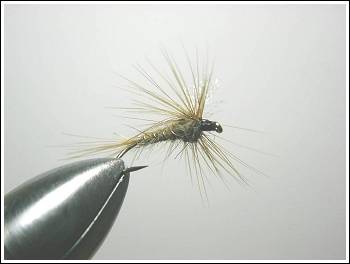
Photo 3k.

Photo 3l.
As mentioned before, in
alternative method a pinch of the pheasant tail feather fibers or alike
is used instead of the wire loop. The tying procedure is similar, with
the characteristic details as follows:
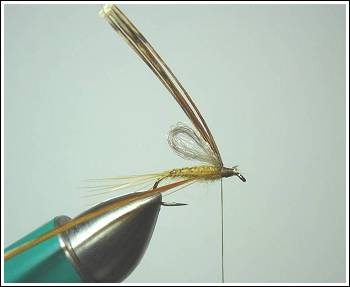
Photo 4a.
Tie the tails, the wing and the
body (in this example #14 hook, dubbed body, polypropylene yarn loop
wing). Take a pinch of the pheasant tail feather fibers, similar as when
tying thorax cover for nymphs, and tie it in front of the wing (Photo 4a
above). Instead of the pheasant tail you may use another suitable
feather or synthetics.
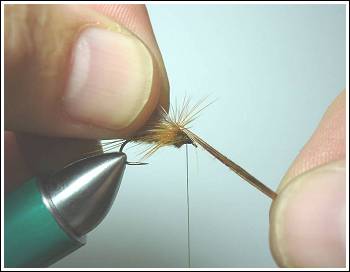
Photo 4b.
Tie the hackles and wrap around
the wing and the thorax cover (in this case pheasant tail feathers), and
secure with couple of turns of the tying thread around the hook, similar
to the wire loop method shown above. Leave the thread hanging over the
hook neck. Then take the thorax cover and pull it down over the hook eye
(Photo 4b above).

Photo 4c.
Finish the fly as with the wire
loop method (Photo 4c below). Trim the waste, and apply the head cement
over the knot and the torah cover.
The completed fly is shown on
Photo 4d below. Note how the thorax cover divided the hackles over the
hook in a kind of "hair style" look, leaving the hook eye accessible for
connecting to the leader.
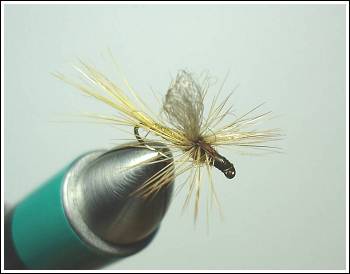
Photo 4d.
At the end, I hope that you
would find the shown methods useful and relatively easy to apply, and if
you decide to try, may it bring you some fun and eventually some fish.
By Milan Trickovic,
Belgrade March 2009 ©
|