|
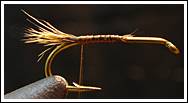
How to Tie a Hare's Ear
Nymph
By R. Wollum

The origins of this fly are hard to come
by but I found references that trace it back to the 1880's, and even as
far back as the 1600's. Charles Cotton and Izaak Walton ring a bell.
Enough said, this fly has stood the test of time. With all it's
variations the gold ribbed hare's ear can imitate a wide variety of
trout foods, but especially mayfly and stonefly nymphs. It works great
on the Yellowstone, Boulder, Stillwater, Madison, Lamar, and just about
every other freestone river I can think of. Here is basic recipe for
tying this truly wonderful fly: Step 1.
I like to start
wrapping the thread from the middle of the hook shank backwards,
stopping just in front of the barb. This gives me a good visual
reference. One trick I use, which saves time is snapping the extra
thread off rather than cutting it off. You simply hold the extra thread
in your fingers tightly and yank it towards the eye of the hook...
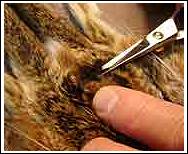
Step 2.
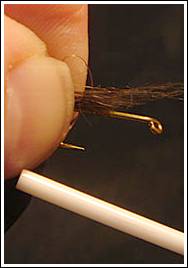
Clipping a small amount of hair
from between the eyes on the hare's mask, I pinch the tips of the hair
with force and pull out the under fur.
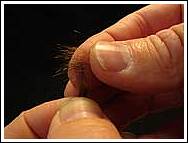
Next, transfer the hair to the other hand,
and measure the tail against the hook shank. When satisfied with the
length, transfer it again so you are holding both the tail and the hook
shank.
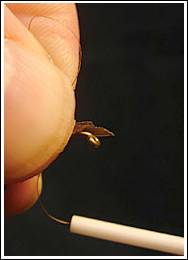
Make sure to use a loose wrap of thread to
attach the tail to the hook shank. (This will prevent the hair from
rolling off the hook shank). As you pull your thread up, pinch your
thread between your thumb and index finger over the top of tail and pull
straight down.
 Step
3. Again, use the slack loop method to tie in the gold oval tinsel on
the bottom of the hook shank, allow it to hang or you can put it in a
material clip if you have one.
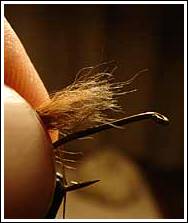
Step 4. Next pull some dubbing (under
fur and guard hairs from the cheeks of the mask). Mix this soft fur
together. Then pinch and spin it onto thread forming a thin noodle of
dubbing. Wrap this forward to the middle of the hook shank, making
several wraps of thread in front of the dubbing to secure it to the hook
shank.
Step 5. Wrap your tinsel forward in an
even spiral over the dubbing and tie it off. If you need to, you can use
a bodkin to pull out the dubbing as you wrap the tinsel. This will
ensure that your dubbing is not matted down and will spike
outwards,giving your fly a more "buggy" look. Next trim any excess.
Depending on fly size you'll use three to five wraps of tinsel.

You're
already half way done!
Use your scissors to measure how much
wing to cut. Keeping your scissors slightly open, pull them away from
the quill.

Step 6. Next cut a thin grouping of
turkey tail or wing. Try to be careful not to let the feather split
while cutting it off the quill. Tie the turkey feather on (dull side up)
using the slack loop method mentioned above. Allow the feather to stick
out over the back of the hook.
Step 7. (Optional). Wrap
lead around hook shank then cover with thread wraps to secure. Depending
on the size of fly you're tying, you should be using .010"-.025" sized
lead wire.
Tip: I like to change my thread color for each weighted fly.
For example if I am tying .20" weighted flies I will use green thread
for the entire fly. For .025" I will use brown. Since the dubbing covers
up your thread, only the head will have a different color. This way when
I'm on the stream and have found a deep hole to fish, I look for a brown
threaded hare's ear nymph in my fly box.
Step 8. To complete the thorax, make a
dubbing loop.
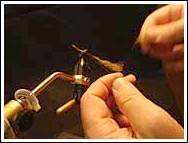
Twist this loop of dubbing several times until tight.
Depending on the size of fly this could be as little as 3 turns, or as
many as 20. Next, wrap this dubbing loop forward to just behind the eye
of the fly. I like to use my hackle pliers for holding onto the dubbing
loop for extra control. Tie off and trim excess.
Step 9. Carefully pull wing case forward
(so it doesn't split), over dubbed thorax, tie off, trim, then whip
finish.
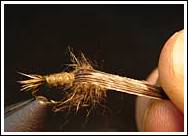

Pick out the dubbed thorax under the wing with a bodkin, needle,
or extra hook to bring the "legs" out. This is a good trick to get your
fly to look more "buggy". The real trick however, is getting your next
20 flies to look like the one you just tied!
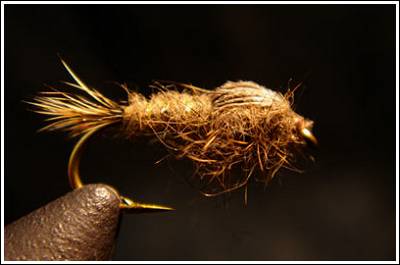
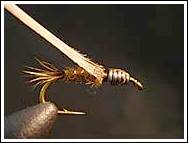
Other options include: bead head, soft
hackle, flash back and epoxy on wing case. (see photo).

Now go out and get that big brown trout to
eat your fly! Text
and photo by R. Wollum
Article published by
permission of
Yellowstone Angler |