|
Sliding knot for multi
fly leaders
By Milan Trickovic
When fishing with two or more flies on
the leader, one of technicalities to consider is how to construct
appropriate leader. If there is a need to change flies more frequently,
like when searching for fish in apparently inactive water, or trying to
fool a wary trout, or other, the leader arrangement should enable this
without having to retie the leader too often. In the same time, the
leader shouldn’t be prone to tangles. Can such requirements be met with
reasonable effort?
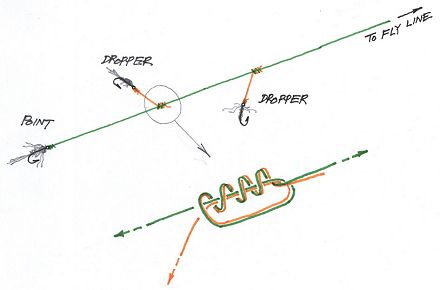
Conventional multi fly leaders are made
of main filament (strand) with the point fly at its end and one or more
lateral filaments, called droppers, connecting other flies (see sketch
1). Droppers are usually tied to the main filament by dropper knot
(see Knot Page in this magazine) also known as overhand,
surgeons, water, or Cove knot.
Sketch 1
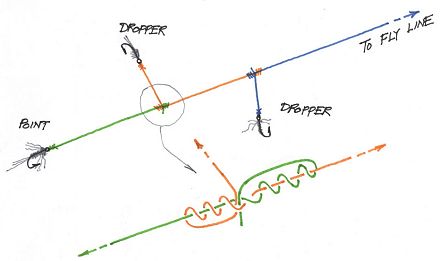
Alternatively, droppers can be filament
ends protruding from blood knots used to connect segment
of the leader (see sketch 2).
In both cases once tied droppers cannot be
extended later on, and with each change of the flies become shorter and
shorter. Usual droppers of 10 to 15 cm allows only for a few fly changes
before the leader has to be retied again. Longer droppers can give room
for more changes of the flies, but this will usually result in tangles
and unhappy fisherman.
Sketch 2
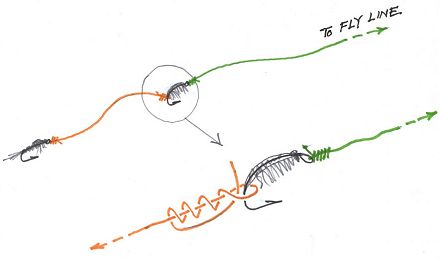
One of alternatives to the conventional
style leaders is so called New Zeeland style, where leaders do not have
droppers projecting out of the main filament. Instead, the leader is
constructed of segments directly connecting eye of the bottom fly with
the hook bend of the upper fly (see sketch 3).
Sketch 3
Such arrangement is beneficial in reducing
tangles, but requires some more effort when changing some of the upper
flies, whereby the bottom part of the leader has to be minded after the
old fly is removed, and then two knots have to be tied to the new fly.
Not a problem for young eyes and steady hands, but rest of us may
occasionally lose a fly or two, or even meet with the hook point. Also,
if the upper is a dry fly, sometimes it is unnaturally pulled by the
bottom flies.
Now, if you are bothered with some of
the above, I suggest you may try leader arrangement with a sliding knot
explained below. In my experience, such leader is relatively easy to
tie, it allows changing length of droppers without having to retie the
leader, it is not weaker than other leaders nor it is more prone to
tangles.
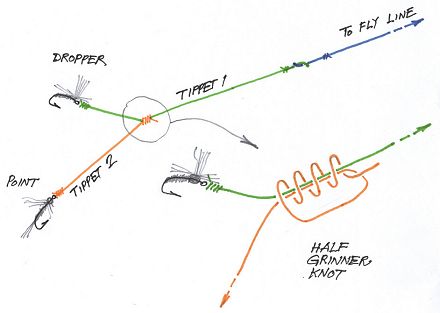
The leader consists of the upper part
and chained tippets suspending the flies. Thus for two fly leader you
would need two tippets (see sketch 4), and for three flies three
tippets. I do not recommend having more than three flies as it would
make the system difficult to handle, but you can try if you like.
Sketch 4
Construction of the leader goes from top,
i.e. from the fly line, to bottom and it is most practical if you do it
directly at the water side. First you should connect the leader upper
part to the fly line. For this I usually use commercial 4x tapering
monofilament leader shortened to 1.2 to 1.5 m, with loops at both end
for connecting to the fly line and the first tippet. Loop connections
are simple to tie and enable easy replacement when needed. You may use
other material and length as you would normally do in your conventional
multi-fly leader.
Then you should connect the first tippet to the upper part and tie the
first fly at its bottom end. Tippet material, diameter and length should
be suited to your local conditions. For example, for summer stream
fishing in Serbia I usually use 80 cm of fluorocarbon monofilament 0.14
mm (for flies #16 and #14) or 0.16 mm thick (for flies #14 and #12). To
tie flies you should use your favorite knot. I prefer clinch knot
as discussed at the end of this paper.
So far nothing special happened, but now
is time to do the trick. Take next tippet and connect it by half
grinner knot tied around the previous tippet at some point above
the upper fly (see sketch 4). Then tie the next fly at the bottom end of
the new tippet segment. This completes the leader construction if you
want to fish with two flies. If you want three, just repeat the process
with the next tippet and fly.
Additionally, if you need to sink the
flies deeper, instead of using weighted bottom fly you may tie just
another piece of tippet and put a split shot or two on its point. Such
assembly sinks readily and is much easier to release from the bottom
hang-ups. I use it from time to time.
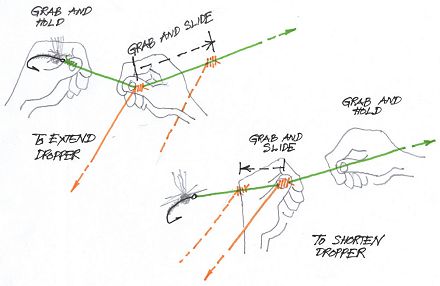
Once the leader is tied, lengths of any
dropper can be easily changed by sliding half grinner knot above
the dropper fly, either to create more room for changing of the fly, or
to shorten the dropper to reduce tangles, or to enhance dry fly behavior
by providing appropriate dropper length. To slide the knot you have to
pinch it by fingers and pull it along the tippet around which the knot
is tied. To extend the dropper slide the knot upwards (see sketch 5),
and to shorten the dropper slide the knot downwards,
while keeping the upper tippet tensioned by your other hand.
Sketch 5
Resistance to sliding can be somewhat
regulated by number of turns in the knot. For tippets as in the above
example 4 to 5 turns would be fine.
When you have to change the upper fly,
simply extend the dropper if needed, cut of the fly and tie the new one,
for which no special effort is needed apart for taking care not to pull
the bottom tippet while there is no upper fly, since it may slip loose.
The changes can be repeated number of times before you have to retie the
leader, depending on the tippet length provided in the first place. For
changing the bottom fly simply cut it from the point and retie the new
one.
Some words on tying the knots…
The described sliding half grinner
knot is easy to tie since you may create initial loop of any size
appropriate to your fingers and to facilitate subsequent wrapping of the
knot. On tightening, hold both sides of the new tippet and pull, but
previously moisten it to reduce friction and subsequent strength loss.
For the final pull you can use forceps or teethes or else as you would
normally do. Like with all other fishing knots, it is important to
tighten it properly. After tightening, trim the waste filament above the
knot.
For tying the flies I use clinch
knot (also known as half blood knot) tied with aid of
forceps, as explained by Bruce E. Harang (1998) in this magazine. After
minor training one can easily automate hand movements such that tying
takes some 10 seconds, and can become a kind of pleasure compared to
tedious exercise if you do not use forceps but rely on sharp eye which
you have no longer.
Finally a few words on strength...
From my experience it seams that
described leader arrangement is not weaker than conventional leaders. If
the bottom fly is hooked to fish or snag, the sliding knot at its top is
pulled and it readily slips down to the upper fly. If accidentally or
intentionally the pull is too strong (say you have to break the leader
hooked to the high tree or deep in the water), the leader would break on
the sliding knot and never on the fly knot, so you would not loose the
both flies. At least it never happened to me using leaders similar to
the example given above.
More importantly, so far I have not
experienced any problem in hooking the fish this way, and it seams that
slipping of the knot is even acting as some kind of shock absorber. At
least for the fish size I use to catch, i.e., for brown trout and
grayling up to 30 cm long. I assume the same would apply for more hefty
fish, but you would have to verify this yourself.
If the upper fly is hooked, the leader
is actually a bit stronger than the conventional since there is no
dropper knot connecting this fly and the rest of the leader (the sliding
knot above the upper fly in this case is not loaded at all).
And that is all. I hope that you may
find leaders with sliding knots useful and relatively easy to apply, and
that it would safely lend you some good fish.
Text and pictures by
Milan Trickovic
Belgrade, August 2009 ©
|