|
Tying
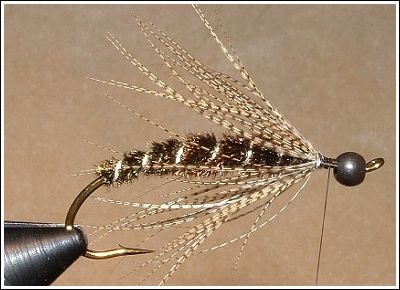
The Steelhead Caddis
by Jason Akl

Although
you almost certainly have to many go to patterns in your spring season
fly box, adding one more to the collection really couldn’t hurt. I am
almost positive that most early season anglers carry a few of the
time-tested standards like leeches, marabou streamers, egg flies and
stonefly nymphs. However using something a little out of the ordinary
might just be what the fish were looking for. On heavily fished waters
trout see the same sets of patterns fished over and over. Whether it is
anglers trying to imitate eggs washed out from the spawn, or the big
stones hatching of the water a few key patterns spend more time soaking
then the rest.
First and foremost let me make it clear that
there are no real caddis flies the same size as the steelhead caddis
pattern. This type of pattern does not directly resemble one specific
type of organism but rather a grouping of bugs that are seen this time
of year in the upper Midwest. Caddis, stonefly and mayfly nymphs are all
regularly found in rivers and streams during these early months so
patterns that resemble these aquatic insects are at times more
attractive to fish. The steelhead caddis in general resembles a large
cased caddis but is tied so that it could also pass for large stonefly
nymphs or mayfly nymphs. This pattern plays into the opportunistic
feeding behavior of hungry trout, hoping that they will not be able to
pass up a large easy meal.
The steelhead caddis can either be fished like
a nymph (dead drifted under a strike indicator) or actively stripped in
against the current. In most cases with rivers that have large riffles
or runs it is a good idea to drift this pattern one or two times with no
action applied to it. Many trout will simply pick up on this fly as it
rolls along the bottom. If you have no luck on your first few passes
dead drifting this fly then switch over to stripping in the current much
as you would a wooly bugger. In rivers that are cover oriented and have
trout lying under banks and fallen structure; short casts coupled to
stripping the fly aggressively will get trout out of their respected
hiding spots.
Materials Used in the Steelhead Nymph
Hook: Daiichi Curved Shank Size 5
Thread: Black Uni-Thread 8/0
Body: Peacock Herl
Rib: Silver Round Tinsel
Hackles: Barred Wood Duck Feather/ Black and White Guinea Feather
Collar: Black Ostrich Herl
Head: Black Bead
Antennae: Pheasant Tail Fibers
1. Start this fly by sliding the bead over the
hook point and up to the front of the hook. Wrap some lead free weight
onto the hook (the middle ½ of the hook shank) and attach the thread to
the hook. Take a few turns of thread around the weight to secure it into
place.

2. Tie down a three-inch section of silver
round tinsel at the point above the barb (extending off the back of the
hook shank) and then tie in a group of three peacock herls. Twist the
peacock herls in to a rope with your fingers and advance them up the
body of the fly. Stop about an eighth-inch from the back of the hook
eye. After you have tie off the tag end of the herl rope counter wrap
the silver ribbing up the body of the fly stopping at the same spot you
finished the herl body.

3. Select a nice barred wood duck feather and
strip the soft fuzz from the base of the feather. Pull the feather
quills backwards so that just the very tip is standing straight up by
its self. Tie this feather down to the hook shank by this tip at the
point where you stopped the herl body (wet fly hackle style). Wrap this
hackle around the shank two times then tie off and clip the tag end.
4. Repeat this process of prepping the feather
for the guinea hackle and tie it down in front of the wood duck feather.
Wrap the guinea hackle two times around the hook shank then tie it off.

5. Clip two long (2 inch) pheasant tail fibers
and tie them down to the hook shank so that they sweep backwards into
the hackles you just created. Cut two black ostrich herls and tie them
down as well in front of the hackles. Palmer these herls forward
creating a bushy collar for the fly stopping when you reach the back of
the bead. Whip finish the thread and cement.
By Jason Akl © |