|
Navy Blue Heron in the
Syd Glasso style
Presented and tied by Bruce E.
Harang
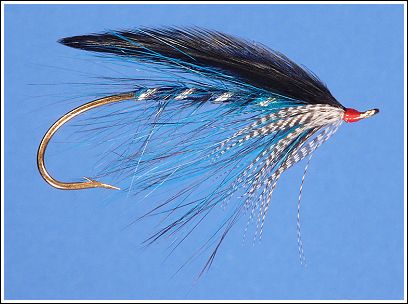
Materials
Hook: Return loop up eye salmon,
size and weight to suit (shown is Partridge code CS10/1G)
Thread: Gudebrod 6/0, White or other light color as working thread
Hackle: Whiting silver doctor blue spey hackle over Whiting
claret spey hackle wrapped as a single feather
Ribs: Medium flat sliver tinsel overlaid with fine oval silver
tinsel
Body: Rear 2/3 - french navy blue floss; front 1/3 - silver
doctor blue seal or substitute
Throat: Teal flank
Wing: Black hackle tips
Head: Gudebrod 6/0, Red
This is one of a series of Syd
Glasso style spey flies I am currently working on using two different
colors of spey hackle folded together and wrapped as a single hackle to
produce a multicolor spey hackle which I call "blended" for want of a
better description. In addition, these flies are tied with Pipers brand
90 denier silk threads which are proving to produce lovely silk bodies
at an advantageous price.
Tying Instructions
1. Mount an up eye return loop
salmon hook in your vise.
2. Attach the thread at the
point the wings will be tied in and wrap a smooth flat thread base to a
point just above the point of the hook. If you are using an in-line
rotary vise an easy method is to use one finger of your working hand as
a moving thread bobbin holder and use the off hand to turn the vise
while moving the thread rearward. If you start with an untwisted thread
and let the bobbin hang free you will create a very thin flat thread
base. I prefer to use a very light working thread such that if the
materials over it become translucent in the water their colors are not
muddied by a dark background.
3. Tie in the spey hackle by the
tip, then the ribs, tying in the flat tinsel closer to you than the oval
tinsel. I tie the spey hackle and rib on the bottom of the hook. This
allows puts the exposed hackle stem section in front of the hook bend to
protect it. Leave tag ends on these materials that reach at least to a
point 1/3 of the hook shank length behind the eye to provide a smooth
even underbody for the floss.
4. Bring the thread back to the
1/3 point of the hook shank binding down the ribs and spey hackle. Again
an easy way of creating this smooth thin flat underbody of thread with
an in-line rotary vise is to use your working hand as a moving thread
bobbin but this time moving forward. Tie in a length of French navy blue
silk floss (here Pipers 90 denier silk floss), or substitute synthetic
floss, by wrapping forward from the tie in point using 5 very tight
turns of thread. Leave a silk tag that reaches to the starting point of
the fly or longer.
5. Wrap the floss back to the
rear of the body and then forward to its tie in point. Of course you
want to avoid tying down any of the spey hackle fibers. Unwrap 4 of the
tight binding wraps used to mount the silk and then tie down both ends
of the silk with a few tight wraps of thread. To create the smoothest
floss body burnish the floss to smooth out and pack the silk fibers.
Create a dubbing loop against the front end of the floss body portion
and then bring the thread forward to the starting point. The smoothness
of the underbody is not as critical here as the front body portion is
dubbed.
6. Insert a small amount of seal
dubbing or substitute (here the dubbing is SLF silver doctor blue), spin
the dubbing loop to lock the dubbing in place, pluck out any loose
dubbing fibers, wrap the dubbing in touching turns to the front of the
body, and tie off. Cut off any excess dubbing and loop.
7. Wrap the flat rib forward in
5 turns and tie off. Next wrap the oval rib over the center of the flat
tinsel so it is overlaid onto the flat rib.
8. Bring the spey hackle forward
wrapping it immediately behind the rib and tie off in the front. Cut the
excess. Tie off the working thread and cut it off. Mount the red thread
used to make the head. Tie in a collar of one or two wraps of teal flank
feather. Cut off any excess feather.
9. The wing comprises two pair
of black hackle tips. The pairs are mounted curved toward one another to
form a knife blade wing having a length longer than the body but short
of the bend of the hook so that the wing can not fowl around the hook
shank. The wings should be mounted low over the body. To mount the wing
take all four feathers and size them leaving the bare stems connected.
Insert the four bare stems through the hook eye and position the wing
base just in front of the teal collar. Tie down with several very tight
thread wraps and check the wing to insure desired position (tented over
the hook shank and covering the top half of the fly at the tie-in
point). When you are satisfied with the wing position, pull the stems
out of the hook eye and cut off flush with the binding wraps.
10. Complete a small
proportional head and apply head cement and gloss finish. I use Griffs
Thin penetrating head cement to lock everything together and then Sally
Hansen Hard as Nails with Nylon finger nail polish for the gloss finish.
This product does not absorb water and therefore does not turn milky
white when being fished. If, as here, I want to cover the bleeding
through of the black hackle wing stems I coat the head with several
light coats of a red finger nail polish.
Text & photos by Bruce
E. Harang ©
Fly in article is tied by Bruce
Visit Bruce website,
Beaucatcher |