|
|||||||||||||
|
|||||||||||||
|
Versione Italiana:
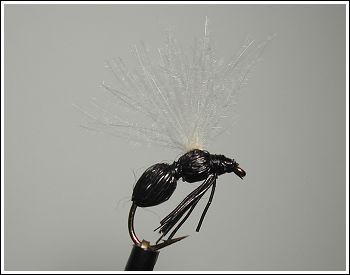
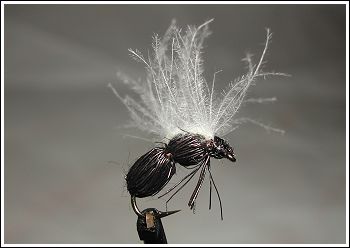
Formica in
pelo di cervo Realizzai la mia prima imitazione di formica all’inizio degli anni ottanta, quando smisi di riprodurre le mosche di altri costruttori e passai dal puro esercizio manuale all’uso del ragionamento. Avevo sentito raccontare da un pescatore di catture effettuate con una imitazione di formica in pelo di cervo e mi venne la voglia di costruirmene qualcuna. Poiché non avevo osato chiedergli il dressing della formica, fui “costretto” ad ideare un procedimento per ottenere l’imitazione e, dopo diverse sperimentazioni, arrivai a definire il seguente dressing.
Dressing 1) Blocco un amo diritto nel morsetto ed inizio ad avvolgere il filo di montaggio intorno al gambo, partendo dall’occhiello. Dopo aver raggiunto la curva, mi fermo e posiziono parallelo sul gambo un ciuffetto di peli di cervo di dimensioni adeguate per realizzare l’intera imitazione. 2) Avvolgo due o tre giri laschi di filo di montaggio sulla metà del ciuffetto e li stringo lentamente e progressivamente in modo che i peli si irradino uniformemente intorno al gambo dell’amo. A quel punto stringo definitivamente le spire e consolido il fissaggio dei peli. 3) Mi sposto con il filo di montaggio verso l’occhiello dell’amo, evitando di intrappolare i peli sul gambo e, quando ho deciso quale sarà la lunghezza dell’addome della formica, mi fermo, rovescio in avanti i peli di cervo e li blocco sul gambo dell’amo. in questo modo ottengo l’addome della formica. 4) A questo punto mi sposto con il filo di montaggio accanto all’occhiello, rovescio in avanti i peli di cervo e realizzo il torace della formica. Recido le eccedenze dei peli, lasciandone alcuni sotto al torace per imitare le zampe. 5) Fisso due punte di hackles di gallo fra il torace e l’occhiello dell’amo, recido le eccedenze delle Hackles e termino l’imitazione eseguendo una testa abbastanza voluminosa. Ho sempre fornito di ali le imitazioni di formica per poterle vedere meglio in acqua. Le ali consistevano in punte di hackles di gallo o in ciuffetti di barbule di CDC fissati accanto all’occhiello dell’amo e rivolti indietro sopra al torace. In seguito, quando mi accorsi che l’addome dell’imitazione occupava buona parte dello spazio della curva dell’amo, utilizzai anche gli ami grub per costruire questa imitazione.
Di Agostino Roncallo 2011 ©
|