|
Coloring Raw
Tubes
By Bob Kenly
A look into some
alternative methods of coloring tubes
I
open my mailbox to find the usual "junk mail", bills,
advertising, mostly a waste of my time. It did however
include a package from my Canadian friend, Stuart Anderson,
who owns the
Canadian Tube Fly Company. Tubes, lots and lots of
tubes, many sizes and shapes of tubes along with a note,
"See what you can do with these". He said he manufactures
these tubes because of the many complaints he had from North
American Steelheaders who's chief objections included too
heavy a weight of certain European tubes along with the fact
the pre-colored tubes chip badly with heavy usage. All of
the tubes were in raw (uncolored) condition except for
anodizing in silver, gold and black.
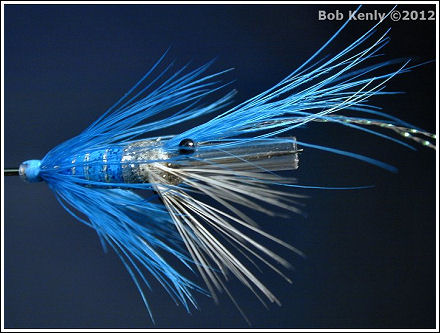
The finished
fly In the
group were some very interesting tapered tubes which Stuart
named "Shrimp Tubes", shrimp flies being my specialty those
really peaked my interest. I wrote my friend, Arthur, in
Northern Ireland, and asked if he would like to try a few of
my flies, he being brave enough to fish anything I can dream
up. His only requirement were the colors, a very dark claret
and picric (sort of a washed out greenish yellow), colors
not usually seen here in North America. The tying part I
could easily handle but applying color to metal tubes,
another matter which made for some interesting experiments,
some successful, some much less so.
Always First,
Sand Your Tubes
No matter what
method you use always sand your tubes. Artists call this
"toothing" a smooth surface, a technique my artist wife
showed me when she paints on smooth surfaces such as
masonite. Artists use a medium such as Gesso to create a
rough surface so the paint will apply evenly and sanding the
tube has the exact same effect. I use emery paper from about
#600 grit for small tubes up to #400 grit for larger tubes.
After I finish sanding my tubes I clean them with a little
denatured alcohol to remove any sanding residue.
The Colored
Powder Painting Method
In this
article Stuart Anderson fully explains the method of
coloring tubes with what he calls powder paint. The process
is fairly easy, basically heating the tube and sticking the
hot tube into the powder, then reheating to flow the
coloring evenly around the tube. He also has glow in the
dark paint, which is a big thing for those who fish at
night. The colors are very bright and tend toward what you
might expect for Pacific salmon or Steelhead. Steelheaders
are hard on tubes and chipping of the paint has been
recorded so Stuart advises that a thin coat of epoxy will
cure that problem if your tubes are abused on rocky stream
bottoms.
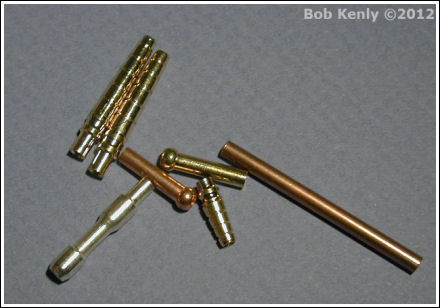
Stuart's tubes
- From The Canadian Tube Fly Company
Spray Painting
I've must have spray
painted hundreds of tubes and most times they turned out OK,
if you use certain types of paint. I've settled on paints
used for outdoor metal furniture, two of which have the
trade name Krylon or Rustoleum as both have a primer mixed
in the paint. The downside is there aren't a lot of color
choices available but if you find what you want and if you
have lots of tubes to color then spray painting is the way
to go. I nail a bunch of small finishing nails in a board
and place my tubes on them (that is before I insert the tube
liner) and spray them all at once. Another downside, spray
paint stinks something awful and something that smelly can't
be good for you. So that limits me to spray painting
outdoors which can be a total bummer since I live in a
fairly active weather part of America. Lots of old clothes,
which have taken on a multi-colored appearance, is the order
of the day. Also a filtered mask to filter out the spray
which always seems destined to swirl about my face, is a
must have to prevent choking fits. If however you do spray
your tubes then I've found a thin coat of epoxy is always
wise to protect your applied finish.
Hand Painting
Method (My Favorite)
The biggest problem
I have with the above methods is the lack of color choices I
have especially when considering the many subtle hues that
seem to apply in nature. Monochromatic coloring is OK in
many circumstances especially when painting lots of tubes
but sooner or later you'll want to step outside the box and
stand alone with your flies, that's were hand painting tubes
comes in. For paint I chose artist's acrylics for many
reasons, the first being the very wide choice of colors
available, almost enough choices to boggle the mind. The
second reason, it's benign, in most cases non toxic (except
for a few cases where heavy metals are incorporated into the
paint, such as titanium white. Glow in the dark paints will
also fall into the toxic category). Third reason, no smell.
Fourth reason, its fairly inexpensive, available almost
everywhere. Fifth reason, easy to mix further expanding your
range of colors. Sixth, easy to clean up with water.
Thinning acrylics:
Sometimes after buying some acrylics you may find that for
one reason or another they seem very thick or "lumpy"
(probably been sitting on the shelf for a long time).
Normally acrylics are thinned with water as they are water
soluble but when painting on metal the finish seemed to be
just a watered down color. A better method is to take a few
drops of denatured alcohol adding and mixing until you reach
the desired consistency, alcohol also seems to aid in the
color's brightness.
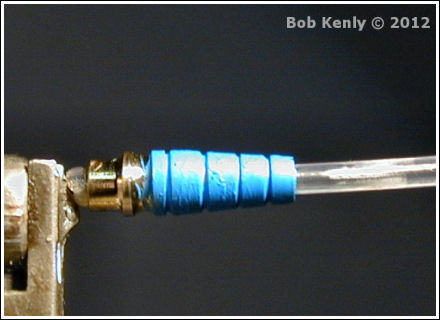
The tube is
sanded and painted its first coat
Mixing colors:
Since I'm color challenged I thought it wise to elicit some
help on the subject, of course the internet my first stop.
After struggling through many mind numbing articles on color
I needed something much easier. I posed the question in my
search engine, "what colors do I mix to make claret?",
answer: red as the base, umber, black and blue. Taking a
folded piece of aluminum foil I put a blob of the base color
in the center (red in this case) and a blob of the umber,
black and deep blue around the edge of the foil (my artist
wife says its always easier to add the dark colors to the
light colors instead of the other way around). Pick a small
amount of the dark color and start mixing a bit of one then
the other till you get the desired shade. To mix the colors
many artists use a pallet knife but a regular kitchen knife
works just as well in a pinch, or even better yet one of
those plastic knives you get in fast food restaurants. One
thing you might notice that after all that mixing your color
may become what is described as "muddy", sort of an
indistinguishable brown, to cure this add a bit of the base
color to brighten up the mix. To get the picric color I
mixed neon green to neon yellow, which seemed very close to
Arthur's samples.

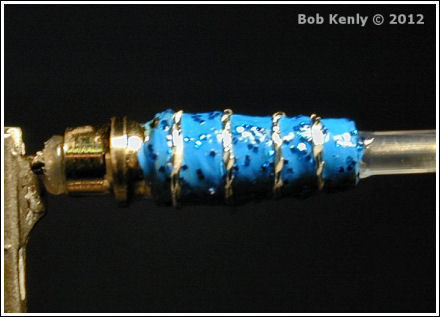
The glitter is
added directly on the blue paint
Highlights:
After you've finished painting your tube you may want to
liven up the color somehow especially if the color choice
seems dull after drying. The very best thing I found is
glitter and the best glitter I found is something used to
make designs on T-shirts. The stuff comes in a whole lot of
different colors, so many colors you won't ever run out of
choices. T-shirt glitter comes in small squeeze bottles and
the glitter is mixed with a glue that becomes clear when
dry. To apply the glitter to a painted surface squeeze a
blob on a piece of aluminum foil and take a pointed small
brush, pick up some glitter and sort of dap it on the
surface. You can't do too much at one time so if you want
real heavy glitter application you'll have to wait a bit
till dry and add more. I have tried to use only glitter on a
tube for color but that doesn't work very well unless you
under coat with a with some acrylics close to the sparkle
colors (ex. silver paint for silver glitter, etc.). Again,
after painting etc. a coat of epoxy is needed to protect the
paint.
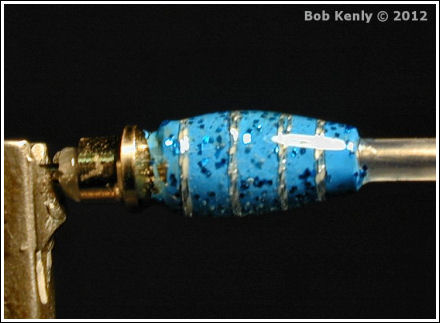
The ribbing is
added
Show and Tell, a
Shrimp Fly
My friend from
Belfast, Northern Ireland wants something in blue and silver
and he's brave enough (or maybe crazy enough) to let me do
as I please. That is with the caveat of no flashing lights,
seems the customs authorities frown upon anything with
flashing lights. Stuff I have: A Stewart Anderson 1/2 inch
shrimp tube (gold anodized). Several small pointed paint
brushes (nothing expensive, cheap ones). Dark blue acrylic
paint. White acrylic paint, I think I'll need to lighten the
blue. Silver acrylic paint. to under paint the section that
will be all silver glitter. Thread, hair, etc.
Epoxy is added
to protect the body
Step #1 Sand the
tube, you may get away from sanding the tube if you are
using the colored powder method or spray painting, however
with hand painting you'll be faced with a "Gloppy" (adj.
author's term for lumpy) finish, been there done that until
I learned my lesson.
Step #2 What I
envision is a shrimp pattern, somewhat Irish (in reality
very loosely Irish). The body, aft part blue and front part
silver. Since the tube is small (12mm, 1/2 inch) and tapered
painting is my only option. The blue I have is very dark and
won't match my other materials so I'll lighten it by adding
the blue to white acrylics until I get the desired shade.
Step #3 After the
body paint is dry with the blue paint I then add the glitter
(in this case blue) directly on the paint (not too much as I
don't want to over do it). Note: I used the glitter that is
mixed with the glue however there are glitter kits which
have the glue separate. In that case you can mix the glitter
directly with the epoxy, just another option.
Step #4 After the
glitter is dry then I add the ribbing, in this case in the
grooves cut into the tube, I used metallic silver thread for
this process. After several unsuccessful attempts to add
ribbing I hit upon the idea of double wrapping the thread in
the groove and finishing with a single overhand knot to hold
it in place. I applied head cement to the knot, let dry and
trimmed the excess thread. If satisfied I then epoxied the
complete body and let dry.
Step#5 The feelers
and eyes are added directly on the hook keeper, the thread
(white in this case) is painted with silver acrylic. After
drying I apply the silver glitter, let dry and cover with
epoxy.
Step#6 Now is the
time to add the forward hackle, again painting the thread
and applying the silver glitter, after dry the silver area
is covered with epoxy and let dry.
Step#7 The fly is
finished with applying the aft hackle and the excess tubing
snipped off.
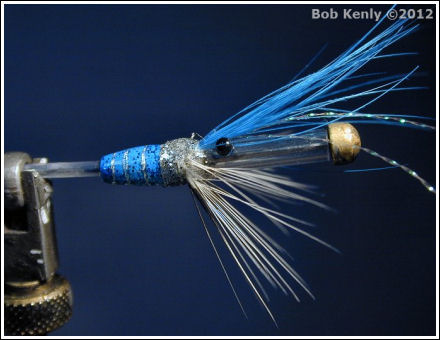
The front of
the fly is completed with the feelers, eyes and forward
hackle.
Retrospect
My good Russian friend,
Yuri Shumakov (1956-2006) once told me that not sharing
one's flies and tying ideas was close to being a criminal
act. True, a very strong statement but one that has guided
my tying efforts for many years. Many times he would
admonish me for not thinking outside of the norm even though
he would reject an idea I had as being totally crazy. The
two of us from very different backgrounds and experiences
melded one idea into another, finding great joy and new
directions in our craft. I hope someone finds my ideas about
coloring tubes interesting and that gives him or her some
kernel of inspiration to head off in a different direction
thus starting a new trend that they will share with their
fellow tiers.
By Bob Kenly 2012 ©
Bob's
website |