|
How to tie
better deer-hair flies
By Chris Helm
Based
on the number of phone calls I receive and conversations at
fly-fishing shows, many fly tiers trying to make the transition
from tying trout flies to hair bugs get frustrated with their
poor results. Typically they aren’t aware of a few tips that can
make the transition easy. Of course, there’s also no substitute
for practice.
1. Buy Good Scissors
After teaching workshops
for many years, I notice that many tiers lack a pair of both
straight and curved serrated hair scissors. The typical
1-inch-long bladed scissors used to tie trout flies are not
adequate. I recommend the Anvil Ultimate Model 70 (right handed)
or 71 (left handed), which cost around $20 each. These scissors
have adjustable cushioned handles, ice-tempered stainless-steel
blades, and one serrated blade that grips and cuts the hair.
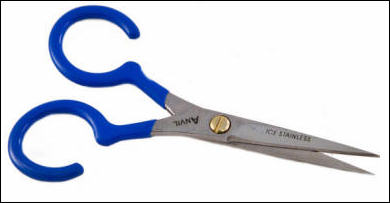
Buy both the straight
and curved models. The curved model is essential for shaping the
hair after all of the hair has been spun on the hook. Trying to
use straight scissors to cut a round shape is inefficient and
leads to poor results.
2. Buy the Right
Bobbin
Because tying hair bugs
requires more thread tension than tying trout flies, a bobbin
that keeps the thread spool in place without having to squeeze
the bobbin, and automatically maintains the correct tension on
the spool, is invaluable. After a standard bobbin is broken in,
it is often necessary to bend the wire arms inward to achieve a
reasonable level of tension on the spool, and still some hand
pressure is required.

I have found that the Rite Mag
or Cermag adjustable bobbins put the necessary amount of tension
on the thread. The long thread tube makes putting torque on the
thread and manipulating the hair easy.
3. Buy the Right Hair
Packer
I have tried all types
of hair packers over the past 30 years, and the only two that
compress both the thread and the hair are the Brassie Hair
Packer and the Anvil Hair Packer.
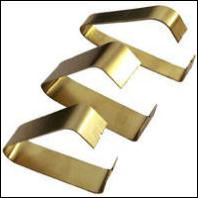

All other hair packers are not
able to slide the thread along the hook shank with the hair
since the tool must be able to get past the hook eye, which is
always wider than the hook shank. Ballpoint pens, dowel rods,
and pieces of aluminum with a hole drilled in the center pull
the hair toward the hook shank rather than push the hair along
the hook shank. By establishing a small 1/4-inch to 5/16-inch
thread base before spinning or stacking the hair, and then
packing both the thread and hair, you get a more durable fly
that is less likely to rotate on the hook. Make sure to use a
drop or two of thin head cement after packing each clump of hair.
4. Use the Right
Thread
I have used gel-spun
polyethylene (GSP) thread since 1988 and find it superior to
nylon or polyester for hair bugs. It is two to three times
stronger for the same denier than either of the other materials.
I have used Gudebrod GX2 (130 denier) for several years, which
has a breaking strength of 6 pounds 8 ounces. Other gel-spun
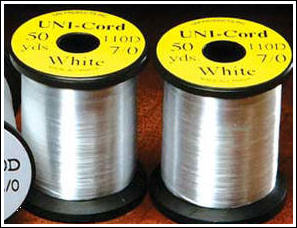
threads that work well include Uni Cord 7/0 (100 denier), Ultra
Thread GSP (100 denier), and Cascade Crest GSP (100 denier).
There are also a number of gel-spun threads between 50 and 70
denier that work well for small hair bugs (size 6 hooks and
smaller) and trout flies where small clumps of hair are used.
Some tiers prefer
Danville’s Flymaster Plus (210 denier), Flat Waxed Nylon (210
denier), Gudebrod G (330 denier), or Wapsi 210 denier. These
threads work most of the time with smaller clumps of hair equal
to one to two #2 wooden pencil-size clumps of hair. With too
much pressure, nylon or polyester thread may occasionally break.
Gel-spun thread is more slippery than nylon or polyester, so the
thread slides easier against the hair when spinning or stacking.
There are a number of patterns that I stack three to five large
clumps equal to four or more pencil-size clumps of hair. In this
situation I try to put as much pressure on the hair as possible
without cutting the hair, and gel-spun thread works every time.
Some people use
rod-wrapping thread and Uni’s Big Fly thread, but I have found
these to be too bulky and they don’t slide against the hair
nearly as well as gel spun. Use the gel-spun thread only for the
hair portion of the fly. For tying materials such as rubber
legs, hackle, or marabou on the back of the shank, use 6/0 (140
denier) threads.
5. Get These Other
Tools
You’ll also probably
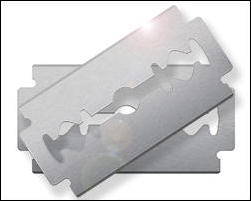
need double-edged shaving blades for smoothing the body, a bone
or aluminum hair comb for removing underfur from the deer hair,
a bodkin for pulling out hairs that sometimes get caught when
applying repeated clumps of hair, an extra-large hair stacker
for evening hair tips for collars on divers and other patterns,
and a thin head cement that penetrates easily.
6. Select the Right
Hair for the Job
(Also read article
Tips for selecting deer hair)
There are three
different animals that most experienced tiers use for tying hair
bugs: late-season cow elk, whitetail deer, and mule deer. Each
animal’s hair has different qualities and certain parts of the
hides have more suitable hair for spinning and stacking. Some
hides have superior hair; others have hair that is not suitable.
Having processed my own whitetail hides for 20 years, I am still
amazed at the uniqueness of the hair on each whitetail deer.
Ideally the hair should
be 2 inches long. Late-season cow elk hair is usually longer
than that. Late-season whitetail and mule deer hair is usually
around 13/4 inches to 2 inches long, with a few hides having
hair as long as 21/4 inches.
The hair should be close
to a nylon paintbrush in texture and snap back quickly to its
original position after running your thumb across the center of
the hair. As a general rule, when looking at natural hair,
lighter color hair tends to have this crisp characteristic more
than dark hair. The darker the hair the less likely it is good
spinning hair. Take the hair out of the package and inspect it
before buying. If the hair feels soft or mushy, don’t buy it.
Cow elk is usually
firmer and more consistent from animal to animal than whitetail
or mule deer, and many consider it to be more durable. I still
prefer to use good quality whitetail or mule deer because it
flares better.
7. Prepare the
Foundation
Always wrap a small,
3/8- to 5/16-inch-wide thread base before beginning to stack or
spin hair. Don’t believe the old wives’ tale that deer hair can
or should only be spun on a bare shank. After establishing the
thread base, place the thread in the center of the thread base.
8. Learn Thread
Control
Cut two to three #2
pencil-size clumps of deer or elk hair as close to the skin as
possible. Comb out the hair to remove the underfur. If the hair
is to be spun or stacked and the fly won’t have a collar, cut
off about 1/4 inch of the tips.
A. Lay the hair
at a 45-degree angle on the side of the hook closest to you.
Make three snug thread wraps around the center of the hair
ending up with the tip of the bobbin about 1/4 inch from the
clump of hair.
B. Flare the hair
about halfway. Use the tip of the bobbin to roll the hair around
the hook. You may need to move the bobbin tip closer to the hair
before spinning the hair after you flare it. Thread control is
critical. Practice this technique until you get good at it.
Another technique for
spinning the hair is to make five snug wraps of thread around
the center of the hair, then pull the bobbin toward your stomach
or chest depending on where your vise is positioned. The hair
will spin and flare. At least two of the wraps that you made
will unwrap.
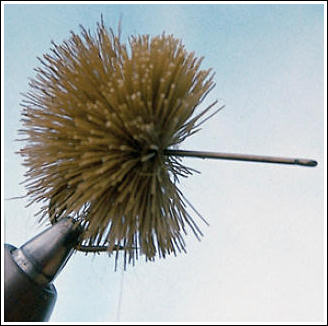
C. After spinning
and flaring the hair to its maximum, bring the thread up from
under the shank and make two thread wraps in front of the spun
clump. Now make two half-hitches. Maintain firm thread pressure
throughout this process.
Next, holding the hair
from behind with the left hand (right-handed tiers), use the
hair packer to pack the thread and the hair. Place a large drop
of head cement at the base of the hair.
Now make another thread
base and repeat the process. Continue until the hair is
about 1/16 inch from the hook eye. When spinning the final clump
of hair, make sure to use at least three to four pencil-size
clumps of hair. Make sure you use enough thread pressure to
flare the hair at a 90-degree angle to the hook shank. This
procedure helps eliminate the less-dense look that is sometimes
found in the front of some popper bugs. If you are tying a diver
body, cut the hair close to the shank and the hair will be as
dense as cork.
After you have spun or
stacked the final clump of hair, make two or three half-hitches
and cut the thread. Gel-spun cuts best under tension and if you
use a sawing motion with one scissors blade or razor blade.
9. Know Your Limits
Do the following
exercise to learn how hard to pull on the thread. Grab the clump
of spun hair with your left hand (right-handed tiers). Gradually
increase the pressure on the thread until you cut through the
hair. This exercise will help develop a touch for flaring hair
without cutting it. Repeat this exercise until you know when to
stop pulling. The hair stops flaring just before the thread cuts
through the hair.
10. Form a Neat Head
with Plastic
Poke a hole in the
center of a 1-inch-square piece of 3 mm plastic. Push the hole
over the hook eye. This plastic keeps stray hairs from catching
in your thread while you are finishing your fly. Attach
140-denier (6/0) thread and build the head. After making six or
so wraps, put some head cement around the head, then continue
building the head until you have a fairly large bullet-shaped
head. Whip-finish and apply a coat of high-gloss head cement.
After the first coat dries, apply additional coats as needed to
obtain a smooth, glossy head.
11. Use Your Hands
Stacking hair involves
the same technique as spinning hair except that the hair on the
bottom of the hook is usually a different color and requires
“rolling” the hair onto the bottom of the hook shank before
flaring the hair. Make three thread wraps around the clump of
hair and push the hair with the bobbin tip onto the bottom of
the hook. Hold the hair firmly with the thumb and middle finger
of your left hand. Pull down with the thread and flare the hair.
To stack the top of the fly, make sure the total amount of hair
used equals the amount on the bottom of the hook.
If you plan to use three
colors, divide the hair accordingly to achieve the same quantity.
Lay the first clump on top of and parallel to the hook shank.
Make two or three wraps. Place your thumb on top of the clump
and your middle finger on the bottom of the fly and pull
straight down. Repeat with the other colors.
Pull the hair back
firmly with your left hand, make two thread wraps, and tie a
half-hitch. Pack the thread and the hair with the hair packer.
Place a drop of head cement at the base of the packed hair.
Repeat stacking hair until you reach the hook eye.
12. Finish Trimming
with a Razor
When trimming any
hair-bug body, you should follow a standard procedure to avoid
ending up with an asymmetrical body. Start by trimming the
bottom of the fly with the serrated scissors. Then use a
double-edged razor blade to finish trimming the bottom.
Next, trim and shape the
face or top of the fly (depending on the type of fly) and then
finish by trimming each side of the fly. Be sure to hold the fly
by the hook bend in your left hand and look at the fly head-on
and from below to make sure everything is symmetrical.
If you are tying a
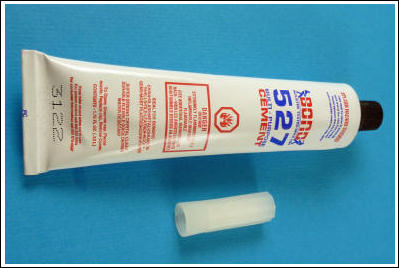
standard flat-faced popper, apply a coat of glue such as Bond
527 to the face of the fly. You can also coat the bottom of the
fly.
13. Practice
The most important
advice I can give you is to practice these tips repeatedly. As
time goes by you will see continual improvement in handling the
hair and trimming. The more time you spend practicing, the
quicker the entire process will become second nature to you.
By Chris Helm
©
Red's note: Chris Helm was
world famous fly tyer tying from Toledo Ohio, wellknown for his
knowledge of deer hair. All over the world Chris tied on several
shows and tying classes. He taught many fly tyers to tie deer
hair flies. In the mid 1990th he started fly tying shop
Whitetail Fly Tieing
Chris Helm passed away in
november 2014. Chris had been battling Cancer for some time. He
will be sadley missed but always fondley remembered in the fly
tying community |