| Many of today’s popular
saltwater fly patterns are using the rediscovered great minnow imitator: 5-minute epoxy,
in their construction. Epoxy has recently become a popular material to use when creating
saltwater flies. This is due to the added durability it brings to flies against toothy
fish, as well as the superb realism it allows fly tiers to yield when creating bait-fish
mimics. Epoxy is not a new material to the fly tying world, it has been around for the
better part of four decades, but many fly tiers still feel imitated by this basic 2- part
adhesive. Some of the fear comes from the belief that in order to use epoxy effectively on
flies the individual is going to need an expensive rotary drier to allow the fly to set
smoothly and finish properly. This statement contains only half truths. Yes, an individual
does need some sort of rotating device to finish flies because turning more than two flies
a day by hand can be a trifle overwhelming, but on the other-hand it does not need to be
an expensive undertaking either. There
are many good epoxy drying devices on the market today such as the NuWave Head Spin HS-1
fly drier but these types of products can be a little expensive for the recreational fly
tier who wants to try his hand at epoxying just a few flies for his own needs. Building
your own epoxy drier can be a weekend project for most people, and the product will
produce a quality drier that will outlast even the most ambitious tiers.
The approximate cost of building your own
epoxy drier runs anywhere between 15 and 30 dollars, depending on what kind of materials
you have lying around the house. If you are like myself and have trouble throwing away
anything (you don’t have to admit it aloud) then you probably have almost everything
you need right in your basement or closet. If you decide to go through with this project
the material list is as follows: 2 foot piece of 1x4 wood, one 7 rpm motor, one AC/DC
adapter (or 6 volt battery), two wire locks, one old wine bottle cork, a small piece of
foam, and eight assorted screws.
First and foremost you will need to find
somewhere to get the motor. Make sure that you buy a motor that is between the 7 and 18
RPM rating (I have found 7-RPM motors to be the best for drying flies, they are slow and
smooth giving the perfect shape). Nuwave tackle sells them for around 20 dollars, but if
you are good at searching the Internet I have heard from friends that you can find them
for as cheap as 7 or 8 bucks. The motor is the most important part of the set up, so make
sure that the one you buy is right for the job. Next, you are going to need some source of
power for the motor. A lot of the epoxy dryers purchased on the market use 6 volt
batteries to power them and you are suppose to get quiet a long life from each battery.
Supposedly, 6 volt batteries give you around 400 hours of turning power, which sounds like
an eternity, but if the one time you finally epoxy the perfect minnow and the battery runs
dead, you will have a not-so-perfect sagging fly.
If you are building your custom epoxy
drier from scrap, why not spend the time and attach an AC/DC adapter. The adapter will
allow you to directly plug the drier into any electrical outlet so you can run it for any
amount of time without worrying about the battery going dead while you are not around. Who
knows, you might someday need the drier to finish that new rod you have always been
dreaming of building, would you chance that to a battery? I was lucky enough when building
my own epoxy drier to find an old AC/DC adapter pack tucked away in my basement, after
some simple wiring it was ready to be mounted. If you have trouble finding an adapter pack
to attach to your motor, try going to Home Depot; I have heard from friends that they
carry them for a good price. You are also going to need some wood to mount the motor on.
Almost any wood will work; just make sure that it is sturdy enough so that when the motor
is mounted it will not fall over.
Finally, you are going to need something
to stick the flies into so that the drier can spin them. There are many ways in which one
can do this, but personally I use an old wine cork glued inside of some flexible foam. The
cork is used as the center mount for the spinning apparatus because it can be pulled on
and off the rotating motor shaft and still not slip the next time flies need to be spun.
It sounds like quiet a bit of work, but you will see that if you follow the step-by-step
instructions and pictures below you will have a great rotary drier for all your epoxying
needs.
The step-by-step construction of your
epoxy drier:
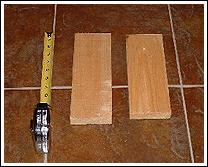
Step 1. Start by getting
a 1x4 piece of wood (does not matter what type) and cutting it into two strips that are of
equal length. I used two 12-inch pieces of pine.
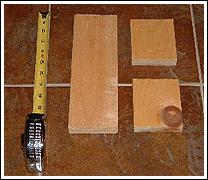
Step 2. Cut one of your
two strips of wood in half, making two separate 6 inch pieces (Make the cuts with what
ever tools you have - circular saws make this easy and a give nice straight cuts, but a
basic hacksaw will do the trick as well). Cut the other 12-inch piece down to 7 inches in
length. You now should have two separate 6-inch pieces and one 7-inch piece of wood.
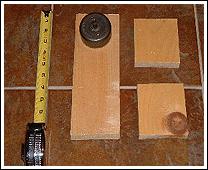
Step 3. Mark 1/2 inch in,
on all four corners of one of the 6 inch pieces to be drilled (to attach the two 6 inch
pieces together). On the second 6-inch piece mark two holes to be drilled along the
centerline (to attach the center stand). On your 7 inch piece of wood, mark out where you
are going to be putting the hole so that the motor can be mounted (I used a 2 1/2 in drill
bit to bore out the hole for the motor).
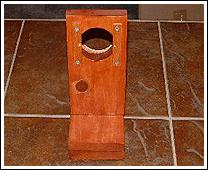
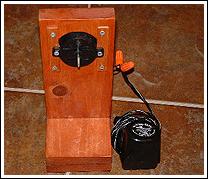
Step 4. This is the
completed stand for the motor. The two six inch pieces are used to make the stand base and
the 7-inch piece was bored out to make the motor rest. I also finished my epoxy drier with
some left over cherry stain to give it a nice finished look.
Step 5. Strip the end of
the AC/DC adapter and connect it correctly to the end of the motor (there is only four
wires to connect together the 2 positive and the 2 negative). Add wire locks to the
connected wires to keep them from loosening and a little electric tape to keep everything
in place. Make sure you do not forget to feed one half of the wire through the opening in
the stand you made or else you will have to take it all apart and do it again.

Step 6. Place the motor
in the hole you bored out for it. If the hole is too big, like in my case, simply add side
straps of wood to make the bored out hole a little smaller. Make sure that your completed
stand, with the motor in place is sturdy and won’t shake and fall over. The last
thing you want is the whole thing falling over when it begins to turn your flies.
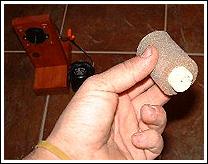
Step 7. Take your wine
bottle cork and a piece of 1/2 x 4-inch thick foam. I used the foam from an old bike pad,
but anything else you have will work. Make sure to push the cork onto the motor’s
rotating shaft first to make the center hole. Them simply place the foam around the cork
and either staple or glue it down.
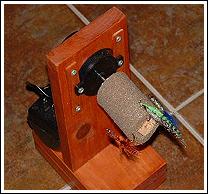
Step 8. After the roller
is complete, place it on you motor and plug the unit in. The roller should rotate as the
motor turns, nice and slow without slipping. Now all that remains is to tie up a batch of
your favorite minnow patterns and splash on some epoxy.
Tight lines and
Smooth threads
Jason Akl © 2003 (Biography) |